
Sewing instructions denim skirt Zeynep
The Zeynep skirt is the perfect choice for all denim enthusiasts . With its rounded pocket openings, a practical coin pocket , patch back pockets, and striking decorative stitching, it offers an authentic denim look .
The A-line silhouette flatters the figure and gives this skirt a modern, youthful look. Whether you opt for a casual or more sophisticated style , the Zeynap denim skirt is extremely versatile and suitable for a wide variety of occasions.
Available as an ebook in A4, A0, projector format and as a single and multi-size pattern from 34-50.
Length at the front center = 51 - 57 cm
Material:
We recommend denim fabric, corduroy, a firmer cotton, and fabrics that have a medium firmness and therefore a certain structure.
Sizes 34-42
- Outer fabric 1.20 m x 140 cm wide
Sizes 44-50
- Outer fabric 1.50m x 140cm wide
Sizes 34-50
- Lining fabric 0.30m x 140cm wide
Sizes 34-50
- Insert 0.70m 90cm wide
zipper
Sizes 34-40 12cm
Sizes 42-48 14cm
Size 50 16cm
1x button 1.6 cm
Just so you know in advance:
Cut:
Place the fabric with the right side of the fabric facing up.
Lay the selvedges parallel to the center so you can lay out the front and back pieces on the fold. For guidance on pattern layout, feel free to refer to our fabric calculation.
All the cut pieces should be placed with the writing facing upwards.
Cut the pattern pieces from your outer fabric.
Always align the grainline arrow in the same direction for all pieces and parallel to the selvedge of the fabric.
Transfer all notches from the pattern by making a 3mm long incision with scissors or with chalk.
Make notches in the seam allowance on the fold of the fabric, as this is always the center point. Markings define the positions of dart ends, pocket positions, and much more. You can transfer them using either chalk or pins.
Seam allowances are included - 1cm wide or as indicated by the marking notches!
If you'd like to make your Zeynep dress from corduroy, please note that corduroy should be cut against the grain. We have a video for you on this.


You will need the following fabric:
- 2x front part, mirror image
- 2x back piece, mirror image
- 2x Back part, mirror image
- 2x waistband overlap, mirrored
- 2x waistband underlap, opposite
- 2x back cuff in the fold
- 1x coin pouch
- 1x belt loop
- 1x zipper placket
- 2x back pockets opposite each other
- 2x pocket-sized mirrors, opposite each other
- 2x pocket receipt, mirror image
- front and back hem facing in the break

You will need the following from the feed:
- 2x pocket linings, opposite each other


You will need the following from the insert:
- 2x waistband overlap
- 2x waistband underlap
- 2x back cuff in the fold
- 2x Pocket-sized mirrors
SEWING INSTRUCTIONS:
Seam allowances are included – 1 cm wide or as marked.
To sew this skirt you will need a sewing machine and an overlock sewing machine, or alternatively the zigzag stitch of your sewing machine to finish the cut edges.
The colored lines in the pictures show you, in addition to the description, where to sew a seam or glue something.
When sewing, pay attention to the seam allowance included in the pattern. Seam allowances not specifically marked are 1 cm wide!
Have fun sewing!
You start your Zeynep project by beginning to process and complete all the small parts.
Bag processing:


First, neaten the sides and the bottom edge of the coin pocket. Then, fold over the top edge (1cm fold) and iron the sides to a 1cm fold.

The top edge is then stitched with a seam at a distance of 1 cm.

The next step is to attach the coin pocket to the right-hand pocket mirror. Start by stitching the sides close to the edge and continue by sewing a second seam 5 mm away. Finally, topstitch along the bottom edge. Then, finish the raw edges of the pocket mirror.

In the next step, you neaten the edge of the pocket.

Then you sew the pocket facing onto the pocket lining (wrong sides together). Topstitch the first seam approximately 5mm from the opening edge and the second seam approximately 5mm from the outer edge.

Repeat the same step using the pocket mirror and sew the seams as shown in the picture.

Next, we'll work on the back pockets. Start by finishing the sides and bottom edges and ironing them under by 1 cm. Fold over the top edge by 1.5 cm on each side.

The fold at the upper edge of the opening is also sewn with a straight stitch 1cm away from the edge.
Waistband construction:

In the next step, you'll work on the waistband. First, join the back piece to the two front pieces by closing the side seams and then pressing the seam allowances open. Make sure you don't mix up the facings (upper and lower placket).

Next, you join the inner and outer cuffs by turning the top edge and sides together.


Then the back center is topstitched close to the edge, and the second decorative seam is added.

Next, we'll move on to the front of the skirt. First, you'll apply interfacing to the top and underlap. Then, you can trim the underlap according to the cutting line on the pattern.
Then you can close the front center up to the mark and then neaten the edges.

Also neaten the edges of the top and bottom flaps and iron both over in the front center.

In the next step, you sew on the pocket bags. You start at the curved opening line by sewing the pocket bag and facing, right sides together, to the front skirt piece. Then clip the seam allowances so that the curve lies flat when pressed.

Then fold the pocket lining inwards and iron everything flat. Before continuing with the bag, topstitch the two decorative seams onto the opening from the right side.

Then fold the pocket bags together at the mark (fold), sew them together at the bottom and also finish the edges.

You can then fix the pocket bags by stitching a seam in the side and at the waist, approximately 5mm from the edge.
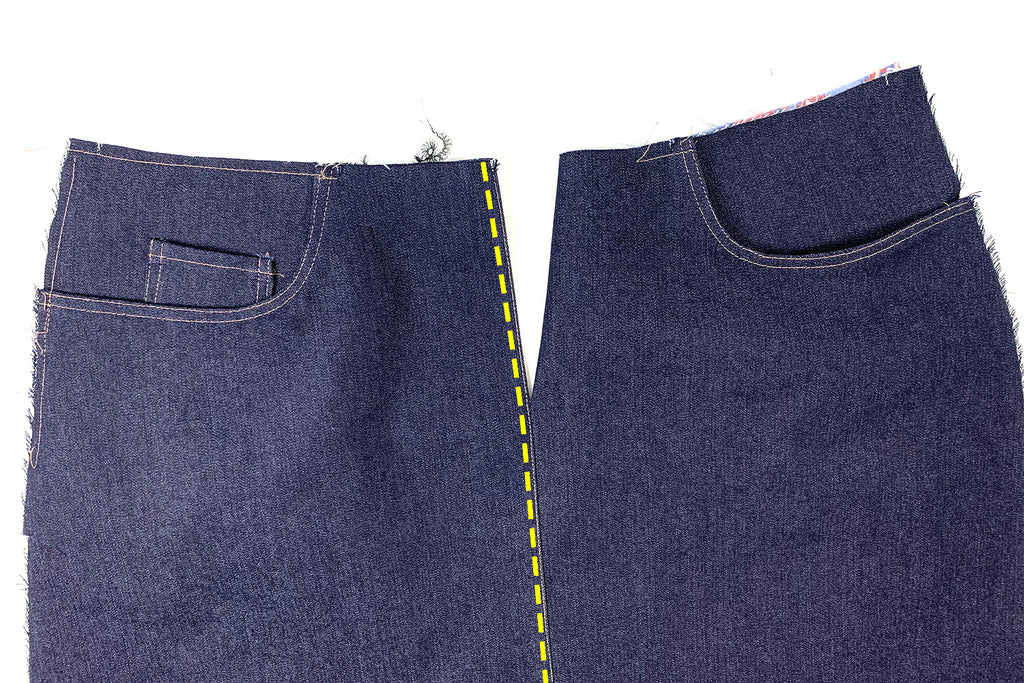
The pockets are now almost finished, and before you continue sewing, stitch the first decorative seam close to the edge along the front center of the front piece.


Prepare the zipper facing by ironing it in half (wrong sides together) and then sewing a seam 1cm from the edge, which you then finish.
Use a half zipper foot for this. Place the closed zipper against the finished edge and sew it along this edge, 1 cm from the seam. Make sure to position the zipper 1 cm away from the top open edge, which will then be hidden inside the waistband.

Place the skirt piece (left side of the body/lapel) on your zipper facing and topstitch the folded edge close to the edge. It's best to do this with the zipper open. Make sure to maintain an even distance from the zipper track, otherwise your zipper won't open properly later.

Close the zipper and secure the center front. The placket will cover the zipper by 1 cm. Sew the right side of the zipper to the placket. IMPORTANT: To sew the zipper to the right side of the placket, unfold the placket.

Now you'll add the decorative seam to the top of the skirt, near the zipper, using the template as a guide. Fold the underlap to the side; it won't be stitched.

Then you install a locking mechanism and connect the upper and lower overlap at this point so that the lower overlap cannot fold away.

Then you can also add the second decorative seam along the front center.

In the next step, the belt loops are sewn to the waist seam at the markings.

Now you can sew the prepared waistband to the inside of the skirt. It's best to pin the skirt and waistband together at the markings. Make sure you sew the waistband's facing to the skirt's facing.

Once the cuff is sewn on, trim the corners at the front center before turning it right side out.

IMPORTANT: Before you fold the belt loops upwards, stitch the cuff along the lower edge.

You have two options when sewing on the belt loops.
Option 1: First, topstitch the cuff close to the edge along the upper edge, and then sew on the belt loops.
Option 2: You sew on the belt loops while topstitching the cuff close to the edge.

Now you finish the raw edge of the facing. Then, sew the bottom edge of the facing to the skirt hem, right sides together. Next, topstitch the seam allowances flat against the facing and then fold it to the inside of the skirt.

Now you'll add the two decorative seams. Start the seam at the top edge of the skirt, making the seam slightly narrower than the width of the facing to ensure the facing is correctly aligned.

Now all that's left is to make the buttonhole and sew on a button.
Your ZEYNEP is finished !
If you get stuck or have any questions, please feel free to contact us by email at info@schnittmuster-berlin.de. We will reply as soon as possible.
Have lots of fun with your new designer piece!
Sincerely, your Schnittmuster-Berlin team.