Sewing instructions for Nuru pants
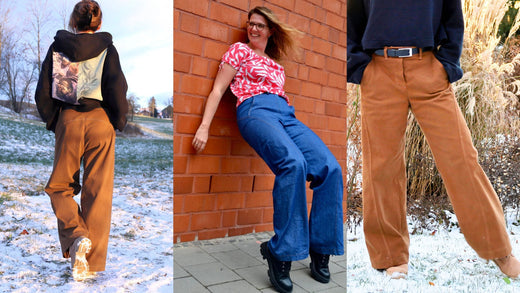
Fashion likes to change its silhouettes and proportions, so trousers are once again more fitted at the waist and have wider legs. The pattern of the Nuru trousers is therefore very trendy; the flared hem is somewhat reminiscent of the bell-bottoms of the 70s. What makes Nuru special, however, are the dividing seams that run from the back yoke across the side seam to the hem of the front leg. The trousers fit beautifully narrow up to the hips and then widen towards the hem. The slanted pockets and the double topstitching at the seams give them a very sporty look.
Hem width = 54 – 62 cm
Side length without waistband = 105 cm
In this tutorial, Nuru was sewn from a trouser fabric with 3% elastane content.
Required materials:
We recommend a fabric made of fine corduroy, denim or wool.
| Sizes 34-40 | Outer fabric | 1.70 m | 140 cm wide |
| feed | 0.25 m | 140 cm wide | |
| insert | 0.50 m | 90 cm wide | |
| Forming tape | 1.50 m | 12 mm wide | |
| zipper | 1x | 12 cm long | |
| Button | 1x | 1.6 cm diameter |
| Sizes 42-50 | Outer fabric | 2.10 m | 140 cm wide |
| feed | 0.25 m | 140 cm wide | |
| insert | 0.50 m | 90 cm wide | |
| Forming tape | 1.50 m | 12 mm wide | |
| zipper | 1x | 13 cm long | |
| Button | 1x | 1.6 cm diameter |
Cutting:
Seam allowances are included - 1cm wide or as per marking clips!
Cut out the pattern pieces from your outer fabric, lining fabric, and interfacing. Lay the fabric right side up. Place the selvedges parallel to the center so you can place the waistband on the fold at the back. The pattern pieces should all be laid with the writing facing up. Always align the grain arrow on all pieces in the same direction and parallel to the selvedge of the fabric. Transfer all notches from the pattern by making a 3mm cut with scissors or chalk. Notch the seam allowance on the fold, as this is always the center. Marks define the positions of dart ends, pocket positions, and much more. Transfer these either with chalk or pins. It's best to roughly cut all outer fabric pieces that will be completely covered with interfacing first. After you have secured the interfacing, cut it out precisely. There is also a video here about gluing and securing pattern pieces.

 You will need fabric:
- 2x rear pants opposite
- 2x front trousers opposite
- 2x saddle opposite
- 2x pocket bags-1 opposite
- 1x underlay
- 1x belt loops
 also with insert:
- 2x waistband at the back in the fold
- 2x waistband top step opposite
- 2x waistband underlap opposite
- 1x front trousers upper leg right side of the body
 You will need from food:
- 2x pocket bags-2 opposite
Sewing instructions:
Seam allowances are included - 1cm wide or as per marking clips!
To sew these pants you will need a sewing machine and an overlock sewing machine, or alternatively the zigzag stitch on your sewing machine to neaten the cut edges.
When sewing in a zipper, you'll also need the right presser foot for your sewing machine. The colored lines in the images, in addition to the description, show you where to sew a seam or glue something.
When sewing, pay attention to the seam allowance included in the pattern. Seam allowances not specifically marked are 1cm wide!
Have fun sewing!
There is also a video about the pocket processing of the Nuru pants.

(Note: The photo is of the Benedikte jeans!)
To prevent the width of your pocket opening from expanding, we recommend reinforcing the opening with a 12mm wide shaping tape.
Next, we'll make the pockets. To do this 

Pocket bag 2 made of lining is placed, right sides together, on the saddle, stitched 1 cm apart, and the seam allowances are neatened. The seam allowance is ironed toward the center back. 
Now take pocket bag 2 and place it right sides together on the previously turned pocket bag 1. Sew the bags together along the curve and neaten the seam allowances together. Close the seam only up to the mark on the pattern (see yellow line). 
Add a 0.5cm auxiliary seam so that the pocket is held correctly and can be included later when working on the waistband. 
Now the back and front trousers can be sewn together. To do this, place the cut back trousers and the prepared front trousers with the saddle right sides together and stitch everything with a 1cm stitch. Then neaten the seam allowances together and press them back. Pay attention to the notches marked on the pattern. 
The seam allowance is stitched twice onto the back of the trousers, once with a 0.2cm edge and once with a 0.7cm stitching foot. 
The right leg is now prepared enough to be finished all the way around . The hem will be pressed over at the notches while still open. This makes it easier for later finishing. 
The hem is folded over and stitched along the previously ironed edge. 


Start by preparing the belt loops: Neaten one of the long sides of the belt loop strip. Then, with the unneeded raw edge facing wrong, iron it 1cm over, then fold the finished edge 1cm over. Iron everything flat. 


Next, we'll work on the waistband. Sew each of the three waistband pieces together at the side seams. Press the seam allowances open. 


Neaten the bottom edge of the inner waistband.
This allows you to attach the finished waistband to the pants, right sides together. Then, iron the seam allowance into the waistband. 

Turn the waistband right side out and iron it flat again if necessary. Then topstitch all the way around the waistband, keeping close to the edge. Fold the belt loops under 1cm at the top edge and simultaneously secure them with the topstitching at the top edge of the waistband. 
Then straighten the belt loops and fasten them at the bottom edge (under the waistband). 
Finished stitched waistband. 
Finally, the buttonhole is pierced on the right side of the body and the matching button is sewn on.
Your NURU is ready !
If you're stuck or have any questions, please email us at info@schnittmuster-berlin.de. We'll respond as soon as possible.
Have lots of fun with your new designer piece!
Sincerely, your Schnittmuster-Berlin team.