
Sewing instructions short coat Ebony
The Ebony short coat stands for a puristic look and impresses with its classic lines. Waist darts and the side dividing seams in the front and back ensure the short coat has a figure-hugging fit. The concealed walking slit provides sufficient mobility when sitting, the lining used there rounds off the high-quality workmanship.
Length at center back = 86 cm
Ebony was sewn from boiled wool in this pattern.
Required material:
We recommend a heavy jersey walk or wool fabric.
Sizes 34-42
- Outer fabric 2.20m (140cm wide)
- Lining 1.70m (140cm wide)
- Insert 1.90m (140cm wide)
Sizes 44-50
- Outer fabric 2.50m (140cm wide)
- Lining 1.90m (140cm wide)
- Insert 2.20m (140cm wide)
- Buttons 4 x 36" 2.2cm diameter
- Form tape 12mm wide 2.50 m long
In advance for you as information:
cutting:
Cut out the pattern pieces from your outer fabric, lining fabric and interlining. Lay the fabric right side up. Lay the selvedges parallel to the center so you can place facing-back in the fold. The pattern pieces should all be face up. Always align the grain arrow on all pieces in the same direction and parallel to the selvedge of the fabric. Transfer all the notches from the pattern through a 3mm long incision with scissors or chalk. Pinch the seam allowance in the fold of the fabric because this is always a center. Markings define positions of dart ends, pocket positions, etc. Transfer these either with chalk or pins. It is best to first roughly cut all outer fabric parts that are completely covered with an interlining. After you have fixed the insert, cut it out exactly. There is also a video about gluing and fixing pattern pieces here.
If you want to make your ebony out of corduroy, note that corduroy is cut against the grain. We have a video for you about this.
If you want to make your Ebony out of plaid, Dagmar shows you the best way to cut plaid in this video.


You need from fabric:
- 2x back piece in opposite directions
- 2x side part at the back in opposite directions
- 2x upper arm in opposite directions
- 2x forearm in opposite directions


also with insert:
- 2x document in front, opposite
- 1x receipt at the back in the rupture
- 2x front part, opposite
- 2x side panel in front, opposite
- 2x bag, opposite
- 2x back part fixation/plaque, opposite
- 2x front part fixation/plaque, opposite
- 2x hem and slit back part, opposite
- 2x hem side part front and back, opposite
- 2x hem sleeves, opposite


also with band:
- 2x receipt in front
- 1x slip on the back
- 2x armhole back part (after processing)
- 2x armhole and shoulder front part (after processing)


You need from food:
- 2x front lining in opposite directions
- 2x side in front of the same
- 2x side back opposite
- 1x back step
- 1x back understep
- 2x upper arm in opposite directions
- 2x forearm in opposite directions
- 1x stripe in front
- 2x pocket lining
Sewing instructions:
You will need a sewing machine to sew this coat.
In addition to the description, the colorful lines in the pictures show you where a seam needs to be sewn or something to be glued.
When sewing, pay attention to the seam allowance included in the pattern. Seam allowances that are not specially marked are 1 cm wide!
Happy sewing!

Sew the front facing onto the front piece right sides together...

... and flatten the seam allowances.

Iron the hems and facings of both front pieces.

A simple, straight dart is closed and sewn on the wrong side of the fabric, snap by snap, tapering from the widest point to the tip

The lining strip is enough for both sides. Divide it accordingly in the middle. Iron one of the short stretches over once and then the strip in the fold left to wrong. The inner side is processed cleanly.

Stitch the strip right sides together at the dart opening.

Fold the strip down and topstitch the edge flat.

Position the strip on the other side and stitch it flat on the long and short side, just under the edge.

Now you can sew the front side part to the front part right sides together and iron the seam allowances apart.

The prepared front part is fitted with a shaping band at the armhole and shoulder on the wrong side of the fabric.

You also iron the hems of the front parts according to the snaps in the pattern.

Now make the cuts for the front pocket and stitch the lining onto the pocket opening of the outer fabric, right sides together. Press down the seam allowances to the lining.

Also iron the fold, marked as a snap, and topstitch the lining and outer fabric right sides together. Turn your bag inside out and iron it nicely.

Lay the prepared bag right sides together on the markings on the pattern and stitch through the lower section.

Here you can see a detailed photo of the sewn-on pocket.

Iron the bag upwards and stitch tightly around the edges.

Here you can see a detailed photo of the sewn pocket.

Sew the center back of the back pieces together, right sides together.

Iron the seam allowances apart, the slit together and the hems according to the Knips.

Secure the slit with an extra diagonal seam.

Lay the back side pieces on the back piece, right sides together, stitch them together and press open the seam allowances.
Also in the finished back part, you iron the shaped band into both armholes.
Iron the hems of the back part upwards according to the snaps.

The front and back are prepared and the side seams can be sewn right sides together, pay attention to the seam allowance in the pattern. Iron the seam allowances apart.

Stitch the shoulders together, right sides together, and then iron open the seam allowances.

The back facing is stitched to the front facing, right sides together, and the seam allowances ironed apart.

Finish the neckline by placing the facings right sides together on the outer fabric and sewing them in place.

Flatten the receipts.

Sew the back sleeve seam right sides together and iron open the seam allowances.

Iron the hems of the sleeves upwards according to the Knips.

Also close the inner arm seam right sides together.

Sew both sleeves right sides together into the armholes according to the snap.

Now take the lining pieces to hand. Sew the front side piece onto the front piece, right sides together, and iron the seam allowances to the front.

You also sew the center back of the lining cuts from the back part right sides together. Remember to stop an inch beforehand and snap the corner for further processing.

Then stitch the short stretch right sides together and snap the corner a little here as well. Press the seam allowances and lining fold to the right side of the body.

Stitch the back side pieces to the back piece, right sides together, and iron the seam allowances to the center back.

Place the front and back lining right sides together and close the side seams, then iron them apart.

Sew the shoulder seams right sides together and iron out the seam allowances.

Place the upper sleeve onto the lower sleeve, right sides together, and sew the back sleeve seam together. Press the seam allowances backwards.

At the inner arm seam you leave a 10cm opening in the left sleeve for later processing of the hem. Sew lining sleeves right sides together into lining body.

Stitch the lining to the front and back facings, right sides together. Press the seam allowance to the center back.

The lining is secured with an extra lining strip at the upper shoulder point inside the seam allowances.

The armpit is also secured with a backstitch within the seam allowances.

Sew the lining sleeve hem right sides together to the ironed sleeve hem. You fix the hems of the outer fabric with an auxiliary seam at the seam allowances, so the hem cannot fold down or become distorted when you put it on.

Now let's move on to the center back slit processing. Work the top step, i.e. the left side of the body, right sides together and iron the seam allowances to the side.

Here you can see how the overstep looks processed.

When processing the underlay, you must first close the hem 3-4cm to achieve a clean result. So sew both hems right sides together and 3cm together.

Then fold the hem of the outer fabric upwards according to Knips and stitch the lining and outer fabric right sides together up to the beginning of the slit.

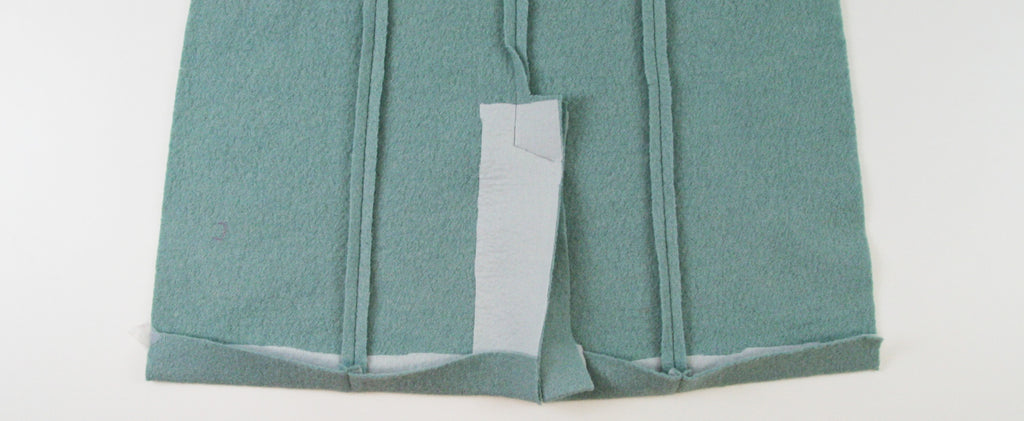
Process the hem of the coat. Use the lines in the photo as a guide. At the seam allowances of the dividing seams, secure the ironed-up hem with coarse stitches. The hem always stays in position, regardless of the type of fabric.

Sew the last opening in the hem over the opening in the left sleeve.

Turn the coat into its correct position and stitch the opening in the sleeve close to the edge.

This is what the finished hem of your coat looks like.

Last but not least, you work with buttons and buttonholes or decide on snaps, as in our wearing example.
Your EBONY is ready!
If you don't know what to do, or if you have any questions, please send us an email to info@schnittmuster-berlin.de. We will answer you as soon as possible.
Have a lot of fun with your new designer piece!
Sincerely, your Sewing Pattern Berlin team.
