Sewing instructions coat Zoe
What could be nicer than wearing a piece of clothing born from your own creativity during the coldest season?
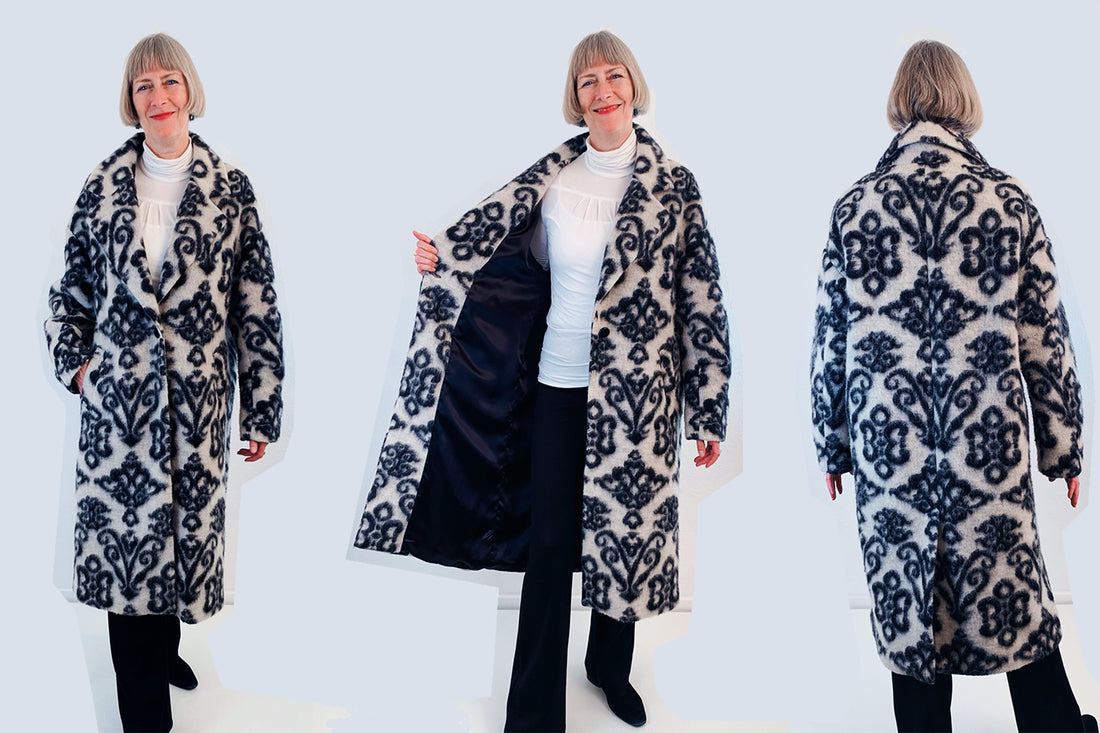
A timeless coat is one of the essential pieces in every wardrobe and this winter we are presenting you a particularly classic piece in our pattern range: the Zoe coat . Zoe impresses with its casual, modern silhouette , the generous lapel collar and the chic welt pockets, as well as a classic slit for freedom of movement in the center back. With its slightly oversized attitude, it gives your look an extra dose of style and comfort.
Length at center back = 116-120 cm.
Required material:
We recommend a sturdy, winter coat material, e.g Wool , cashmere or walk.
Sizes 34-42
- Outer fabric 3.20 m 140 cm wide
- Lining 1.90 m 140 cm wide
- Insert 1.40 m 90 cm wide
Sizes 44-50
- Outer fabric 3.50 m 140 cm wide
- Lining 2.50 m 140 cm wide
- Insert 1.40 m 90 cm wide
Sizes 34-50
- Buttons 1 piece 25 mm diameter
- Forming tape 2.50 m
So, to really dress up as the days get colder, pick out a soft, warm fabric and get to work!
Here are the sewing instructions for the Zoe coat.
CUTTING:
Cut the pattern pieces from your outer fabric, lining fabric and interlining . Place the selvages parallel to the center.
The pattern pieces should all lie face up.
Always align the thread arrow in the same direction on all pieces and parallel to the selvedge of the fabric.
Transfer all the clips from the pattern through a 3mm long incision with scissors or chalk and mark the ends of the darts. Clip the seam allowance in the fabric fold because this is always a center.
It is best to roughly cut all outer fabric parts that will be completely covered with inserts first. After you have fixed the insert, cut it out exactly.


 You need outer material:
- 2x front part opposite
- 2x back pieces opposite
- 2x sleeves in opposite directions (consisting of 3 parts each)
- 1x upper collar in the break
- 1x undercollar in the break (diagonal cut)
- 2x collar band in the break
- 2x front part facing opposite
- 1x back cover in the break
- 2x pocket strips in opposite directions
- 2x rear pocket bags in opposite directions


You need lining material:
- 2x back parts
- 2x front receipt opposite
- 2x sleeves in opposite directions (consisting of 2 parts each)
- 2x front pocket bags in opposite directions


You need from deposit:
- 2x hem inserts on the back part in opposite directions
- 2x hem inserts on the front part in opposite directions
- 2x front part receipt
- 2x hem insert sleeves opposite
- 1x upper collar
- 1x undercollar
- 2x collar bar
- 2x welt pocket
Sewing instructions:
Seam allowances are included - 1 cm wide or as marked.
To sew this coat you will need a sewing machine.
In addition to the description, the yellow lines in the pictures show you where a seam needs to be sewn or something needs to be glued.
Have fun sewing!

Start by closing the outer fabric. First sew the center back up to the slit and iron the seam allowances apart.

Iron the slit in the left back piece (RT) and iron the hems up (hem turn-up markings).


Then attach the shaping tape to the back and front part (armhole, neck hole, additional shoulder line and upper edge of lapel in the front part) and iron up the hems in the front part (see hem turn-up markings).
Then cover the place for the welt pocket in the front (VT) with insert.
Darts front part:


For the coat sizes. 38-50 there is a dart in the front part.
Sew the darts in the front (VT), 1cm below the lapel corner (marking). Open the seam allowances and iron them apart.
Welt pocket:


Iron the strips in the fold and sew an auxiliary seam 1cm apart along the open edge.
A little processing tip: Stitch the lines of the welt pockets in the front.

Sew the bar to the first line on the face fabric side of the front piece.


Sew the pocket bag (TB) outer fabric (right sides together) to the second guide line. It's best to pin it well beforehand and then from the left side of the fabric so that you can sew on the guide line.

In the next step, cut the pocket opening from the left side, in the middle between the two seams. Do not accidentally cut the seam allowance of the strip or bag.
Then cut diagonally up to the ends of the seams. Pull the strip and bag through the opening to the left side. Iron the strip and the bag well.


Sew the lining bag to the seam allowance of the strip.


Now sew the strip ends and the triangles together. To do this, fold the front part (VT) under the triangles so that they lie freely to the side and then sew along this folding edge on the triangles.


In the next step you can close the pocket bag. Then your welt bag is ready.


In the next step, sew the shoulder and side seams together and then iron them apart.
Then you can secure the hem at the side seams with a small stitch in the seam allowance so that it cannot fold down later.

Sleeve processing:

First, place the small fold in the middle sleeve part (largest sleeve part) and fasten it with a short auxiliary seam.


In the next step, connect all 3 sleeve pieces together and iron the seam allowances apart.


Then close the sleeve in the side seam, iron the seam allowance apart and the hem upwards. You can also press the hem before closing the side seam.
Then lock the hem here at the seam allowance with a small stitch. (Minimum distance 1cm from the open hem edge so that you can still sew on the lining).
Sew sleeves into body:

Now sew the sleeves into the body. Make sure that the clips fit together accurately so that you don't mix up the sleeves.
Collar processing:


In the next step, sew the stays to the collar pieces and iron the seam allowances apart. Then place the collar pieces together (right sides together).
Depending on how strong the fabric you are using is, you can also cut the seam allowance of the curved bridge/collar so that the collar can lay better.

In the next step, stitch the seam allowance flat on the undercollar with just a few edges.

Sew the sides of the collar together. Stop 1cm from the edge. You need this 1cm to attach the collar to the mirror seam.
Document processing:

Sew the front facing together at the shoulder seam with the back facing.


Finally, sew the facing to the front piece. Start at the hem and sew up to the mark on the mirror seam (marker-collar insert). Then trim the corner of the lapel so that the fabric can lay nicely flat at this point.


In the next step, stitch the seam allowances (Nzg.) flat and close to the edges. This is done by using the Nzg. first stitch flat onto the facing from the hem to the marking at the beginning of the lapel. Then you leave a distance of 4-5cm from the corner of the lapel and stitch the nzg. of the facing on the front part flat.

Finally, sew the facing to the hem at 4cm, with a curve at 1cm from the hem. Start with the seam in the fold and lock 1.5cm from the edge of the facing. Trim the corners so that the fabric can lay flat here.
The seam allowance of the facing runs diagonally and the side where the lining is attached is 1cm shorter. This means that the hem edges of the front part and the facing are not congruent at this point.
Sew on the collar:

Sew the upper collar to the facing and the lower collar to the coat. Make sure the seams and snaps line up well and that the mirror seams line up accurately.


Cut the corners just before the seam. You do this so that you can turn the collar around so that you can sew it to the back neck hole.

In the next step, sew the seam allowances of the collar base together so that the upper and lower collar stay together.
Feed processing:

Close the center back of the lining, using the clips as a guide.


Close the sleeve seams; there is no need to leave a slit because we will then turn the coat through the slit in the middle back. Then iron the sleeve seams in one direction.

Close the side seams (front pieces to the back piece) and iron the side seams towards the back.

Close the shoulder seams and press them back.

Then insert the sleeves.


 Then fold up the hem with the sewn lining and sew 10cm of the lining to the underside. A lining fold is inserted at the bottom of the hem.


If you don't know what to do next or if you have any questions, please feel free to contact us by email at info@schnittmuster-berlin.de. We will respond to you as quickly as possible.
Have a lot of fun with your new designer piece!
Warmest regards, your Pattern Berlin team