Sewing instructions Marlene trousers Viola
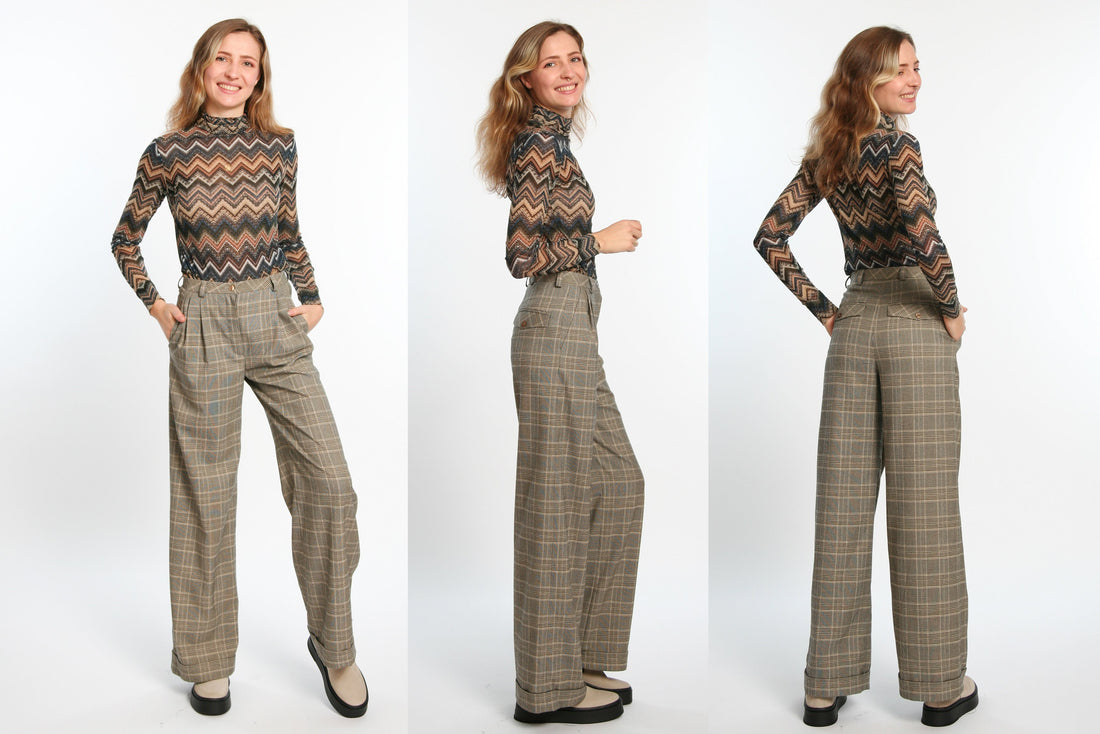
The classic Marlene shape is a trouser style that no woman can ignore at the moment. Double pleats for a casual look with appropriate leg width, slanted pockets and a high hem turn-up give this shape a masculine touch. For an optimized fit, we process the rear waistband piece with an elastic band, and the 6 belt loops also ensure that the belt fits perfectly. If you want to sew your viola out of checkered fabric, then we recommend our video on "Checkering" on YouTube.
Side length with waistband = 109 - 111 cm
In these instructions, Viola was sewn from a viscose/polyester fabric with elastane.
Required material:
We recommend a flowing wool fabric with elastane or a viscose/polyester/elastane blend.
Size 34-42
- Outer fabric 2.30 m (140 cm wide)
Size 44-50
- Outer fabric 2.60 m (140 cm wide)
Size 34-50
- Lining 0.50 m (140 cm wide)
- Insert 0.30 m (90 cm wide)
- Zipper 1x 16 cm long
- Knob 3x 12 mm diameter
- Molding tape 0.60 m, 12mm wide
- Elastic band 0.60 m, 3 cm wide
In advance for you as information:
cutting:
Cut out the pattern pieces from your outer fabric, lining fabric and interlining. Lay the fabric right side up. The pattern pieces should all be face up. Always align the grain arrow on all pieces in the same direction and parallel to the selvage of the fabric. Transfer all the notches from the pattern through a 3mm long incision with scissors or chalk. Markings define positions of dart ends, pocket positions, etc. Transfer these either with chalk or pins. It is best to first roughly cut all outer fabric parts that are completely covered with an interlining. After you have fixed the insert, cut it out exactly. There is also a video about gluing and fixing pattern pieces here.
If you want to make your viola out of cord, note that cord is cut against the grain and the piping is cut with the grain. We have a video for you about this.
If you want to make your viola out of plaid fabric as in these instructions, then note that the pattern pieces of the back flaps, piping and the entire waistband are cut diagonally with the grain.
In this video, Dagmar shows you the best way to cut checked fabric.


You need from fabric:
- 2x front trousers in opposite directions
- 2x hind trousers in opposite directions
- 2x pocket bag receipt opposite
- 2x pocket bags at the back in opposite directions
- 2x pocket bags receipt-inside opposite
- 1x understep
- 1x loop


also with insert:
- 1x waistband (partly stick with insert, see section)
- 2x pocket flap back-inside opposite
- 2x pocket flaps at the back in opposite directions
- 4x piping
- 1x front pant underlay
- 1x front pant step
- cut 1x front pant top step left side of body
- 2x hind trousers pocket position (after dart processing)

also with band:
- 2x front pants pocket opening

From lining you need:
- 2x pocket bags inside
- 2x pocket pouches
-
cut the top step of the right body side of 1x pocket bag inside and 1x pocket bag
- 2x pocket bags on the back inside
Sewing instructions:
To sew these pants you need a sewing machine and an overlock sewing machine, alternatively you can use the zigzag stitch on your sewing machine to finish the raw edges.
In addition to the description, the colorful lines in the pictures show you where a seam needs to be sewn or something to be glued.
When sewing, pay attention to the seam allowance included in the pattern. Seam allowances that are not specially marked are 1 cm wide!
Happy sewing!

First iron the top and bottom step according to the pattern...


... and then the hems of all pant legs. First marked as in the photo, right sides facing upwards.

Then mark as in the photo, left to left the open edge downwards.


And finally the hem edge inside out, left sides together.

Neaten the long sides of the pocket bag receipts inside.


Lay the inside pocket bag facing made of fabric right sides together on the front edge of the front trousers and the inside pocket bag made of lining fabric left sides together on the front trousers behind it. This is how you hide the seam allowances of the pocket opening on the inside of the trousers.


Stitch the inside of the pocket bag slips left sides together onto the inside of the pocket bag, close to the edge.

Fold everything inside out and stitch through the opening of the pocket one foot wide.

Neaten the long curve of the pocket bag receipts.

Stitch the pocket bag facings onto the lining fabric pocket bags, wrong sides together.

Now place the large pocket bag right sides together behind the smaller one and sew the bags shut.

Neat the seam allowances together.

Secure the procedure with a quilt.

Work the pleats as shown in the pattern and secure them with an auxiliary seam the width of a foot.

Secure the bag on the left side of the body on the folded edge of the underlay and in the waistband area with an auxiliary seam.

Secure the bag on the right side of the body approx. 3mm next to the folded edge on the top step and in the waistband area with an auxiliary seam.

Clean the front pants all around.

Now take on the hind pants and process the darts. A simple, straight dart is closed and sewn on the wrong side of the fabric, snap by snap, tapering from the widest point to the tip

Cut out the appropriate inserts and stick on the positions of the rear pockets marked on the pattern.

Neat the hind trousers all around.

Place the pocket flap on the back of the pocket flap, right sides together, inside out, and stitch both on top of each other.


Iron the piping wrong sides together in the fold.

Lay a matching piping right sides together on a flap and stitch with a 1cm seam allowance. This guarantees you a final width of the piping of 0.7 cm.

Place the piping with flap right sides together at the marking on the hind trousers. Use the markings on the pattern as a guide.

Here you can see a detailed photo of the processed flap on the back trousers.

Now draw an auxiliary line with chalk, which is exactly 1.4 cm below the sewing line and is just as long. Note the right angles of the short distances.

Now sew the second matching piping to the previously marked line with 1cm seam allowances. Note the correct width of 0.7cm of the finished piping.

Cut between the piping as marked in the photo.

Turn both piping and pocket flap inside out,...

... this is what the pants look like from the outside, ...

... and stitch the tips onto the piping at right angles.

Neaten the opening edge of the pocket bag-rear-inside made of lining material.

Sew the pocket bag-back-inside to the lower piping right sides together...

... and stitch them flat.

Position the pocket-bag-back right sides together on the pocket-bag-back-inside, close and neaten the seam allowances.

Fold the back trousers down and sew an auxiliary seam through the piping and pocket pouch, just under the edge. This is how you close the back pocket upwards.

Fasten the pocket bag to the top edge of the waistband with an auxiliary seam the width of a stitch.

Lay the front trousers on the back trousers, right sides facing, and close the side seams, paying attention to the seam allowances in the pattern. Iron the seam allowances apart.

Sew the inside leg seams right sides together and iron the seam allowances apart.
In this video, Ellen explains how to work a hem turn-up.

To secure the turn-up in the hem extra, especially important with soft fabrics, turn the turn-up upwards, right sides together, as shown in photo step 1. Stitch a seam about 1 inch from the hem all the way around.

Fold back the cuff as previously ironed. Now stitch the inner finished edge by folding the cuff a little up to the stitching and sewing through in the shadow of the seam so you should meet the inner raw edge under the machine.
For a better understanding of how to sew your zipper and make all the preparations beforehand, we have prepared a video for you here.

Next, close the seat seam just a little bit, right sides together, up to the center front. This keeps the trousers slightly open and the tear can be processed more easily.

Neaten the underlay all around and iron it left sides together in the fold.

Place the zipper on the prepared underlay and stitch it down.

Lay the underlap with the zipper under the ironed underlap of the left front trousers and stitch through the edge.

Pin down the center front so you can better define the position of the zip on the top step.

Sew the other side of the opened zipper to the ironed over flap of the right front trousers.

Now stitch the top step with a template from the right to the front edge. To do this, push the underlay aside so that you don't sew it on.

Here's the view from the other side.

Position the underlap correctly and stitch a seam on the top and underlap. This way the end of the zipper is secured and cannot be seen.

Sew the rest of the seat seam right sides together and iron it open at the center back up to the clip.

Clean up one of the long sides on the strip for the belt loops.

Then iron over the raw edge by 1cm and the raw edge by 1cm. Finally, stitch along the long sides, each 0.2 cm wide.

Cut the strip into 6 pieces of equal length...


... and sew them right sides together according to the markings on the pattern, stitching foot wide, to the upper edge of the trousers.

Serge the lower cut edge of the inner waistband.

Iron the waistband left sides together in the fold.

Stitch the outer waistband to the pants, right sides together, and press the seam allowances up.

In the back waistband you process an elastic. To do this, you have to form a tunnel by stitching through the inner waistband in the shadow of the seam from side seam to side seam.

Cut the elastic to the appropriate length and thread it through the tunnel with a safety pin.

Sew the elastic to the side seams.

Work the short front edges of the waistband right sides together and turn the waistband inside out. Then topstitch it in the shadow of the seam from side seam to side seam.


The belt loops are fixed at the top of the waistband, fold over the top edge 1cm.

Finally, sew a buttonhole in the waistband and sew on a matching button.

There are also buttonholes in the back pocket. Make the holes and then sew on a matching button accordingly.
Your VIOLA is ready!
If you don't know what to do, or if you have any questions, please send us an email to info@schnittmuster-berlin.de. We will answer you as soon as possible.
Have a lot of fun with your new designer piece!
Sincerely, your Sewing Pattern Berlin team.
