Sewing instructions sweater Veronika
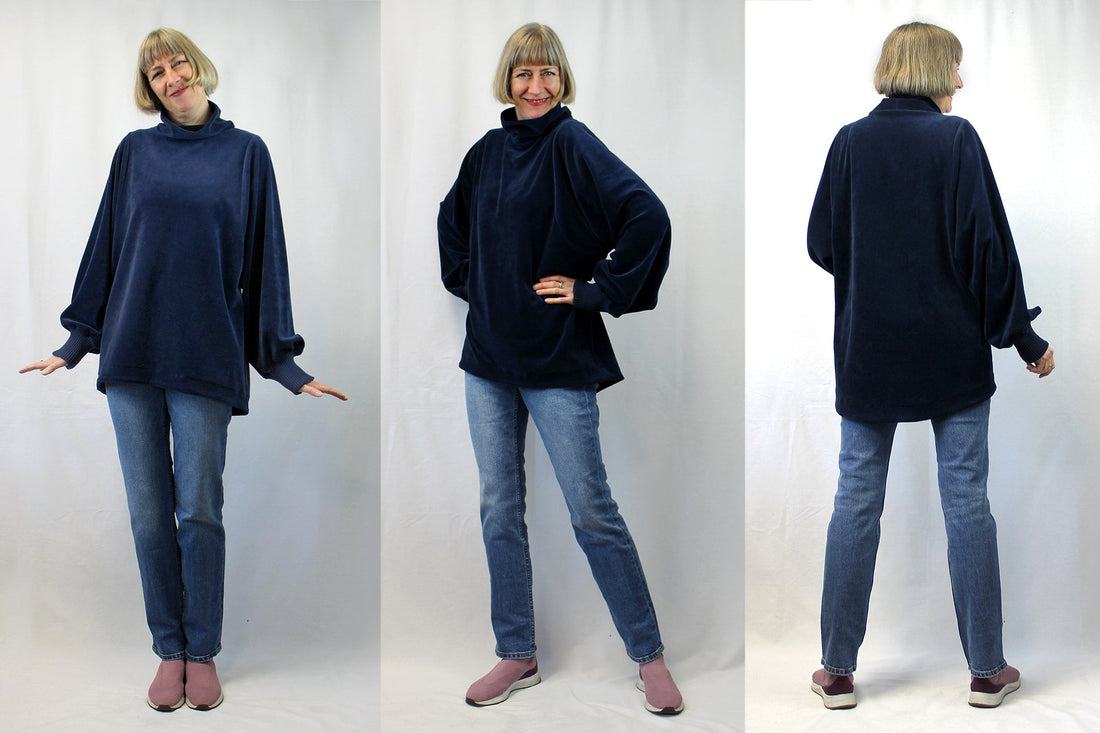
Veronika is a relaxed pullover style based on the design of our Viktoria blouse. The cuffs, roll neck, and the omission of typical blouse details give Veronika a sporty look and the perfect cozy feel.
Length at the back center = 77-83 cm.
Veronika was sewn from a velour fabric in this tutorial.
Materials needed:
We recommend a sweatshirt , velour, or a knitted fabric .
| Outer fabric | Sizes 34-42 | 1.90 m | 140 cm wide |
| Outer fabric | Sizes 44-50 | 2.10 m | 140 cm wide |
| Ribbed knit | Sizes 34-50 | 0.30 m | 54 cm wide |
Cut:
Seam allowances are included - 1cm wide or as indicated by the marking notches!
Cut the pattern pieces from your Outer fabric to. Lay the fabric With the right side of the fabric facing up. Place the selvedges parallel to the center so that you Front piece, back piece, front and back facings You can lay the pattern pieces on the fold. All pattern pieces should be placed with the printed side facing up. Always align the thread arrow in the same direction on all pieces and parallel to the selvedge of the fabric. Transfer all notches from the pattern by making a 3mm snip with scissors or by marking them with chalk. and snip the seam allowance on the fold of the fabric, because this is always a center point. is. Markers define positions of Transfer dart ends , pocket positions, etc. either with chalk or pins .

You will need the following fabric:
- 1x back piece in half
- 1x front part in breakage
- 2x cuffs made of ribbed fabric
- 2x sleeves, mirrored
- collar
- Hem facing front and back at the break
- Neckline strip (optional) made of ribbed fabric
Sewing instructions:
Seam allowances are included - 1cm wide or as indicated by the marking notches!
To sew this sweater, you'll need a sewing machine and an overlock machine, or alternatively, the zigzag stitch on your sewing machine to finish the raw edges. Be sure to use a jersey needle and a stretch stitch. If you're using a regular sewing machine, you should use either a zigzag stitch or a three-step stretch stitch. Afterward, finish all seam allowances again with a zigzag stitch or another suitable stitch to prevent fraying. The colored lines in the pictures, in addition to the written instructions, show you where to sew seams or where to glue. When sewing, pay attention to the seam allowance included in the pattern. Seam allowances not specifically marked are 1 cm wide! Happy sewing!

First, close the shoulder seam. To do this, place the front and back shoulder pieces right sides together and sew the seam. Finish the raw edges of the seam.

Press the shoulder seam backwards.

Sew the sleeve into the armhole right sides together, aligning it with the notches; the seam is then finished together.

Iron the armhole seam towards the sleeve.

Next, you close the side seam and underarm seam in one go and finish the raw edges together.

Mark the center back of the hem facing with a pin; this will prevent you from mixing up the facings later. Check that you have clipped the center back and center front at the hem and on the facing strips; this will make pinning easier. Sew the hem facings right sides together at the side seam to form a ring. Press the seam allowance open.

Neaten the top edge of the facing strip.
 Turn the facing strip to the hem by placing the right sides of the fabric together. Note: the back facing is marked with a pin and belongs on the back piece. ;) Pin the seam in place and sew it closed.

Place the seam allowances on the facing and topstitch them flat, 0.7 cm from the edge. When topstitching, make sure the seam allowance/edge lies flat and doesn't curl up. This method not only makes final pressing easier but also ensures that the facing, if not topstitched separately, will automatically fold inwards and not roll out. Only the facing is topstitched close to the edge of the seam allowances. The stitching line will then only be visible from the wrong side of the fabric, not from the right side.

The hem should now be 4cm wide.

Pin the facing in place, making sure the facing seam is on the inside and not visible from the outside. It's best to insert the pins lengthwise towards the hem. This way, you can remove the pins just before sewing over it.

The hem is now topstitched 3.5cm wide from the right side. You can easily feel the facing edge with your fingers and sew along it.

Make sure you don't slip off the inner edge of the document, but always stay on it. Check that the edge of the document lies flat and doesn't curl up.

You can now iron the facing from the left.

The finished quilted hem.

Next, sew the sleeve cuffs together right sides facing and press in half. Finish the two raw edges together, stretching them slightly. Also finish the sleeve hem.

Mark the halfway point of both the sleeve hem and the cuff with a pin. Insert the sleeve into the cuff, right sides together. The sleeve seam should align with the cuff seam; align the marking pins on both pieces. Distribute the extra fabric from the sleeve hem evenly and sew the seam, stretching the cuff towards the sleeve as you go.

The finished sleeve cuff.

Next, the collar is closed into a circle and then the seam allowance is ironed open.

Now fold the collar in half, with the seam allowance on the inside and the top edge of the collar on the fold. Insert the turtleneck into the neckline, with the collar seam at the center back. Now sew the collar-neckline seam.

Neaten the neckline seam together.
Your sweater is now finished :)))
If you get stuck or have any questions, please feel free to contact us by email at info@schnittmuster-berlin.de. We will reply as soon as possible.
Have lots of fun with your new designer piece!
Sincerely, your Schnittmuster-Berlin team