Sewing Instructions Windbreaker Sophia & Moritz
Sofia:
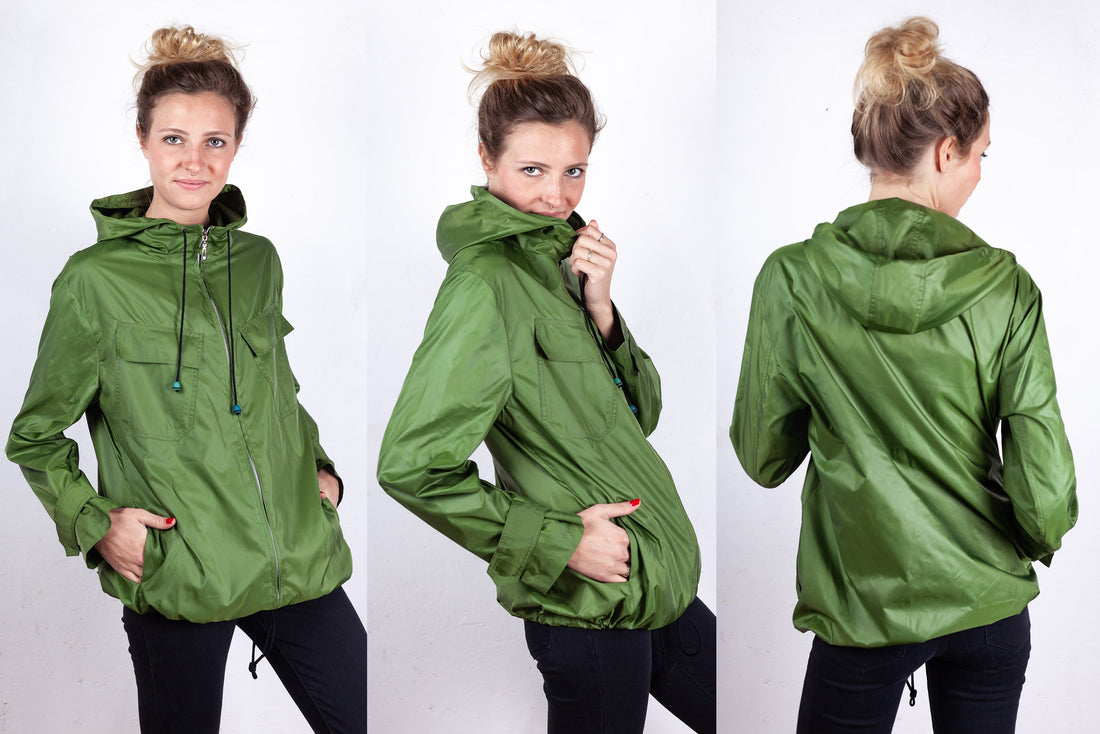
Our next couple pattern is online - the windbreaker Sophia. After you liked Emil and Emilea so much, now comes the counterpart of the Moritz jacket. The same details but tailored to fit women. Sewn from a light material, Sophia is great for many outdoor activities. Hiking, cycling or sailing, Sophia is a casual companion who, at 6! Pockets also bring enough space for all utensils.
Length at center back = 70 - 78 cm
In these instructions, Sophia was sewn from an outdoor fabric.
Required material:
We recommend a light outdoor fabric.Size 34-40
- Outer fabric 2.40 m (140 cm wide)
Size 42-50
- Outer fabric 2.60 m (140 cm wide)
Sizes 34-50
- Velcro tape 0.15m 2cm wide
- Cord 2.70m 8mm diameter
- Cord stopper 4 pieces
- Insert 0.90cm 90cm wide
- Sizes 34-42 1x 70cm long
- Sizes 44-46 1x 75cm long
- Sizes 48-50 1x 78cm long
-------------------------------------------------- -------------------------------------------------- --------
Moritz:
Men who like hiking or cycling can really look forward to our pattern of the Moritz windbreaker. With the hood and the adjustable arm hem widths, you are well protected against wind and rain with this outdoor jacket. The six pockets, two inner pockets, two outer pockets and side seam pockets provide enough space for utensils that men need. The sporty look is achieved with the coarse metal zipper in the front center and the double stitching. The width can also be easily adjusted here with the drawstring in the hem.
Length at center back = 76-81 cm
Required material:
We recommend a water-repellent outdoor fabric or solid cotton.
Sizes 44-50
- Outer fabric 2.50 m (140 cm wide)
Sizes 52-58
- Outer fabric 3.00 m (140 cm wide)
Sizes 44-58
- Insert 0.90 m (90 cm wide)
- Eyelets 4 pieces 10 mm diameter
- Velcro tape 15 cm 2 cm wide
- Cord 2.70 m 8 mm diameter
Sizes 44-52
- Zipper divisible 1 x 75 cm long
Sizes 54-58
- Zipper divisible 1 x 80 cm long
- In advance for you as information:
cutting:
Cut out the pattern pieces from your outer fabric and interlining. Lay the fabric right side up. Lay the selvedges parallel to the center so that you can lay the back piece on the fold. The pattern pieces should all be face up. Always align the grain arrow on all pieces in the same direction and parallel to the selvage of the fabric. Transfer all the notches from the pattern through a 3mm long incision with scissors or chalk. Pinch the seam allowance in the fold of the fabric because this is always a center. Markings define positions of dart ends, pocket positions, etc. Transfer these either with chalk or pins. It is best to first roughly cut all outer fabric parts that are completely covered with an interlining. After you have fixed the insert, cut it out exactly. There is also a video about gluing and fixing pattern pieces here.
If you want to make your Sophia or Moritz out of corduroy, then note that corduroy is cut against the grain. We have a video for you about this.
If you want to make your Sophia or Moritz out of plaid fabric, Dagmar will show you how best to cut plaid fabric in this video.


You need from fabric:
- 2x front part, opposite
- 1x back part in break
- 2x upper sleeves, opposite
- 2x lower sleeves, opposite
- 2x hood central stripes, opposite
- 4x hood, opposite
- 2x pocket bags VT, opposite
- 2x pocket bags RT, opposite
- 2x inner pocket, opposite
- 2x outer pocket, opposite
- 2x flap, opposite

also with insert:
- 2x front piece receipt, opposite
- 4x sleeve tabs, opposite
- Reinforce the outer hood and front section at the buttonholes/eyelets
Sewing instructions:
You will need a sewing machine to sew this jacket.
In addition to the description, the colorful lines in the pictures show you where a seam needs to be sewn or something to be glued.
When sewing, pay attention to the seam allowance included in the pattern. Seam allowances that are not specially marked are 1 cm wide!
Happy sewing!

It is best to start with the buttonholes in the outer hood and in the hem of the front part. Alternatively, you can also use eyelets (1cm diameter).

With our very thin material, we have additionally reinforced the buttonhole with outer fabric on the back.

Sew the velcro to your marks on the upper sleeve and on two tabs (later the inside of the tabs).

Sew the center strip between your hood parts right sides together with a 1cm seam allowance.

Stitch the inside and outside hoods individually, close to the edge and at 0.7 cm on the middle stripe. Then you can topple the two hoods together.

Sew the lower sleeves to the upper sleeves right sides together with a 1cm seam allowance and neaten the seam allowance. Stitch the upper sleeves just under the edge and along the seam at 0.7 cm. Iron the hem with 2x 2cm and unfold it again for further processing.

Prepare the sleeve tabs. To do this, turn one bar with and one without Velcro right sides together.

Position the sleeve tabs between the snaps with the velcro facing down and sew them in place just under the edge. Then you can close the underarm seam right sides together and neaten the seam allowances together.

Now tuck in the hem and stitch through at 1.8cm. The sleeves are prepared so far.

Now we come to the bag processing. You have two templates for this (you may need to cut them out of cardboard). First you fold in the upper edge of the outer pocket 2x 2cm. Then place the template in the middle of the ironed edge. Now you iron over the seam allowance. The bags are given the same shape using the templates.

You can also prepare the inside pockets using the same principle. The pocket opening is stitched at 1.8 cm for all pockets.

Place the pocket flaps in the fold right sides together and close the side edges with a 1cm seam allowance. Turn the flaps and iron them into shape.

First, sew the inner pockets, wrong sides together, onto the wrong side of the fabric on the front pieces. Also topstitch this narrow edge and at 0.7cm. Important: Stitch the inner pockets first and then the outer pockets.

The pocket flaps are also stitched just below the edge and at 0.7cm.

Stitch the outer pockets onto the right side of the fabric on the front pieces in the same way, left sides together, at the marking. Place the flap with the outside on the right side of the fabric and stitch it open at the open edge with a 1cm seam allowance.

Fold the flap down and topstitch the top edge as usual.

Place the pocket pouches of the side seam pockets right sides together on the front and back pieces and stitch them on between the snaps with a 1cm seam allowance. Neat the seam allowance together.

Lay the pocket bags on top of each other and close the side seams and the pocket bag in one seam. Neaten the seam allowances back together.

The smaller pocket bag is attached to the back part. The seam is in the pocket opening and cannot be seen from the outside.

Your side seam pockets are done.

Sew the shoulder seams with a 1cm seam allowance. Neat the seam allowances together and iron them to the front. Stitch the shoulder seam in the front part just below the edge and at 0.7 cm. Then you can sew the outer hood to the neck hole, right sides together.

On the front facing, neaten the edge that is not sewn on, iron it over and topstitch the edge.

The front facing is attached to the inner hood with a 1cm seam allowance. The quilted edge of the slip lies inside the jacket.

Sew the facing to the front hem right sides together with a 1cm seam allowance. Now we come to inserting the zipper. This extends from the hem to the hood. First sew the zipper on the right side of the fabric of the receipt. The top of the ripper faces up. Press down the front edge seam allowance.

This is how it should look like.

Lay the ironed front edge over the zipper so that the teeth are just covered and stitch the front part onto the zipper at about 0.8 cm.

Sew the second side of the zipper in the same way, making sure the hood attachment seam is the same height. Then you turn in the hem 1cm and then 2cm and topstitch it at 1.8cm. The tunnel is ready.

The shoulder seams on the facing are folded over, the edge is stitched and fastened at the seam allowance. Fold over the seam allowance of the inner hood by 1 cm and stitch it up just under the edge of the hood.

Sew the sleeves into the appropriate armholes using the snaps and neaten the seam allowances.

Press the seam allowance into the body and topstitch the body close to the sleeve inset seam.

Fasten the pocket bags to the receipt.

Stitch the tunnel on the hood with 2cm distance to the edge.

Finally, use a safety pin to pull the drawstrings through the drawstrings on the hood and hem.

Your SOPHIA & your MORITZ is ready!
If you don't know what to do, or if you have any questions, please send us an email to info@schnittmuster-berlin.de. We will answer you as soon as possible.
Have a lot of fun with your new designer piece!
Sincerely, your Sewing Pattern Berlin team.
