Sewing instructions for men's shirt Paul
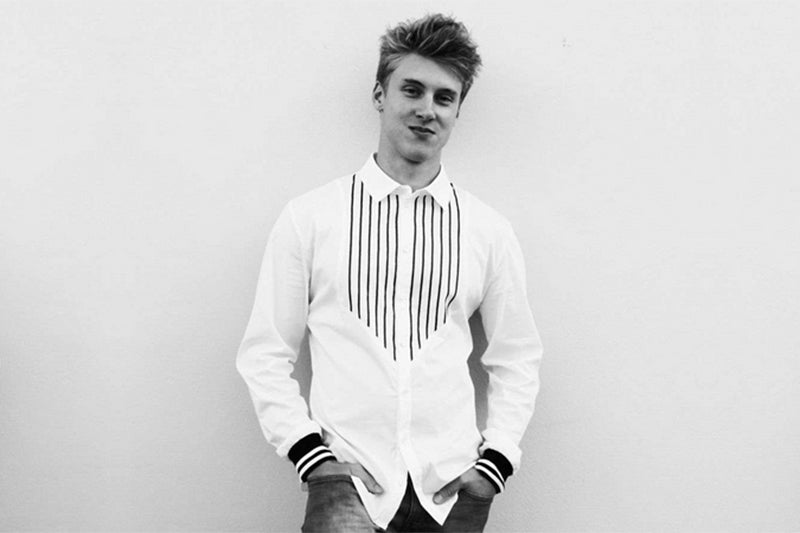
If you've already seen our Paula blouse here, then you'll know that the name Paul for this shirt is no coincidence. In reference to the DEFA romantic film from the 70s, we've designed this figure- hugging men's shirt for you. Most men probably opt for a sweater or hoodie when asked for something – comfortable and casual. Jakob usually goes for one of these two items of clothing too. During the shoot, however, he had to admit with a grin that he thinks Paul is pretty cool and that he feels quite comfortable in it. Maybe you could surprise your husband, boyfriend, father or son. It worked for me, anyway. You can sew Paul with two different armholes: one with a cuff and slit, and the other with a knitted cuff. The insert in the front of our Paul is livened up with 3mm wide black satin ribbons, but you can of course leave these out if you want.
Length in the center back = 69-76cm
In this tutorial, Paul was sewn from a pure cotton fabric.
Required materials:
We recommend a light cotton, preferably with a little elastane.
| Size 44-52 | Outer fabric | 1.70 m | 140 cm wide |
| Size 54-58 | Outer fabric | 1.90 m | 140 cm wide |
| Size 44-58 | insert | 0.80 m | 90 cm wide |
| Size 44-58 | buttons | 12 pieces | 7 mm diameter |
| Size 44-58 | knitted waistband | 0.50 m | 5-7 cm wide |
| Size 44-58 | satin ribbon | 4.50 m | 3 mm wide |
Cutting:
Seam allowances are included - 1cm wide or as per marking clips!
Cut out the pattern pieces from your outer fabric and interfacing . Place the selvedges parallel to the center so that you can place the back piece on the fold. The pattern pieces should all be laid out with the writing facing up. Always align the grain arrow on all pieces in the same direction and parallel to the selvedge of the fabric. Transfer all notches from the pattern by making a 3mm long snip with scissors or chalk and mark the ends of the darts . Notch the seam allowance along the fold, as this is always the center. It's best to roughly cut all outer fabric pieces that will be completely covered with interfacing first. After you have secured the interfacing, cut it out precisely.
 You will need fabric:
- 1x front part opposite
- 1x front yoke opposite
- 1x lower back part in the break
- 1x back yoke in the fold
- 1x sleeve opposite
- either 2x slit stripes and 2x cuffs OR 2x cuffs
- 2x button placket
- 1x undercollar in the fold
- 1x upper collar in the fold
- 2x collar stay in the fold
- thin satin ribbon and buttons, a fabric marker
also with insert:
- 1x undercollar
- 1x upper collar
- 2x cuff
- 2x collar stand
- 1x button placket
Sewing instructions:
Seam allowances are included - 1cm wide or as per marking clips!
To sew this shirt you will need a sewing machine and an overlock sewing machine, or alternatively the zigzag stitch on your sewing machine to neaten the cut edges.
In addition to the description, the colored lines in the pictures show you where a seam needs to be sewn or something needs to be glued.
When sewing, pay attention to the seam allowance included in the pattern.
Have fun sewing!  Two different cuffs are shown here: the regular version with cuffs and the sporty version with retro cuffs. You can choose either version.
Iron the interfacing onto the wrong side of all marked pattern pieces. Transfer the back darts to the wrong side using a fabric marker (heat-sensitive in this case, disappears after ironing). 
Place the notches for the back darts right sides together and mark the points. Now, starting from the center, sew to each point. Just before doing this, reduce the straight stitch to about 1.0-1.5 mm; this way, you don't need to tack the seam. Press the dart outward. 
Fold the back yoke right sides together onto the back piece and close the seam. When you reach the point, leave the needle in the fabric, raise the presser foot, slide the fabric into position, and then continue sewing. Carefully clip the seam allowance at this point, just before the seam, to ensure the seam sits nicely. 
Iron the seam towards the lower back piece and stitch it close to the edge. 
Transfer the markings for the ribbons to the front yoke pieces. You can do this either with the fabric marker or with pins. Stitch the ribbons onto the right side of the fabric, following the markings. 
Repeat this for the other front yoke. 
Fold the yoke right sides together onto the corresponding front piece and sew it in place. Here, too, leave the needle in the fabric at the point (here: the blue clip), raise the presser foot, slide the fabric into position, and then continue sewing. Carefully clip the seam allowance at this point, just before the seam, to ensure the seam sits nicely. 
Press the seam toward the lower front piece and stitch it close to the edge. Repeat these steps for the other front piece. 
Place both front pieces right sides together on the back piece and close the shoulder seams and the side seams of the shirt. 
Now it's time for the sleeves. First, we'll show the regular version with a slit and cuff.
Each sleeve has two notches for a pleat and a slit.
Pin the strip, right side facing, to the left side of the slit. When sewing, make sure to leave the needle in the fabric at the end of the slit, raise the presser foot, and turn the fabric without creating a crease. Sew the rest of the strip on. 
Place the sleeve right side down in front of you. The seam allowance should face the stripe. Fold the top edge inward up to the seam allowance... 
...and then again over the seam. Sew it close to the edge. 
To ensure that the beginning of the slit lies nicely, it is helpful to briefly stitch the strip there from the left at a 45° angle. 
This way, one half of the slit will fit neatly over the other. Mark the two notches for the fold. 
Place the fold towards the slit and pin it in place. 
Close the side seam of the sleeve right sides together. 
Iron the cuff in the middle, as well as the top and bottom edges and seam allowance inwards. 
Pin the cuff to the cuff at the top edge, right sides together. It extends 1cm at each end. Sew the cuff in place. 
Now place one side right sides together in the center of the ironed edge and close the seam. This seam runs directly past the slit (pin). Trim the seam allowance slightly, repeat with the other side seam, and then turn the cuff right side out. 
If you sew accurately, you'll have a clean transition from the slit to the cuff. Fold the still-open, ironed edge of the cuff over the seam and pin it securely. Sew this side close to the edge. 
Repeat these steps for the other sleeve. Transfer the buttonhole markings to the cuff overlay and sew the buttonholes with your machine. 
You can also add cool retro cuffs to your sleeves. You don't need the slit or pleat for this; just sew the side seam right sides together. 
Place the cuff right sides together and close the side seam. Fold the seam allowance in one direction and stitch it in place with a few stitches. 
Place the cuff right sides together on the sleeve cuff so that the two side seams meet... 
… and sew it on with a slight pull. 
This gives you a sporty arm finish. 
This process is now the same for both cuffs: Pin the matching sleeve into your shirt, right sides together. Make sure that the corresponding side seams (here: blue clips) and the shoulder seam line up directly with the markings on the pattern. 
Sew the sleeve cap all the way around. Do the same with the other sleeve. 
Iron the button placket in the middle, as well as the top and bottom edges and seam allowance inwards, just as you did with the bottom hem. 
Pin the button placket, right sides together, to one of the two front edges and sew it to 1cm before the bottom end (here: ironed edge). 
Fold the hem inward at this edge. The button placket now extends 1cm. Place this bottom piece of the button placket right sides together and close it (here: pin). 
Turn the button placket right side out, so the hem will automatically fold upwards by 1 cm. Pin the button placket along the long seam. Sew the button placket in place, close to the edge. Repeat these steps on the other side. Next, topstitch the hem of your shirt from button placket to button placket, close to the edge.
 The shirt collar consists of an upper and lower collar, as well as an inner and outer collar stand underneath. Fold the two collar pieces right sides together and sew them together at the sides and top. Trim the seam allowance in the corners, turn the collar inside out, and topstitch it close to the edge.

Place the two stand pieces, right sides together, on the two collar pieces, so that their top edges line up with the open bottom edge of the collar. Sew 1cm from the bottom edge (here: blue clip) over the curve to the other end (again 1cm from the bottom edge). Trim the seam allowance to about 2-3mm and press the stand pieces neatly outwards. Stitch them in place, close to the edge. 
This is what your collar looks like now. Press the bottom edges of the collar pieces inward by 1 cm. 
Place the collar stand and undercollar, right sides together, on the neckline of your shirt, so that it protrudes 1 cm on both sides. Sew it in place. 
Fold the remaining seam allowance of the collar inward, toward the collar, and pin the ironed bottom edge to it, stitching this seam close to the edge. Then, topstitch the outer edges of your collar close to the edge.

Your collar is ready. 
Transfer the markings for the buttonholes to the future left button placket and sew them with your machine.
On the other side you attach the buttons accordingly.


Your shirt PAUL is ready!
If you're stuck or have any questions, please email us at info@schnittmuster-berlin.de. We'll respond as quickly as possible.
Have lots of fun with your new designer piece!
Sincerely, your Schnittmuster-Berlin team.