Sewing instructions for a Cloud dress
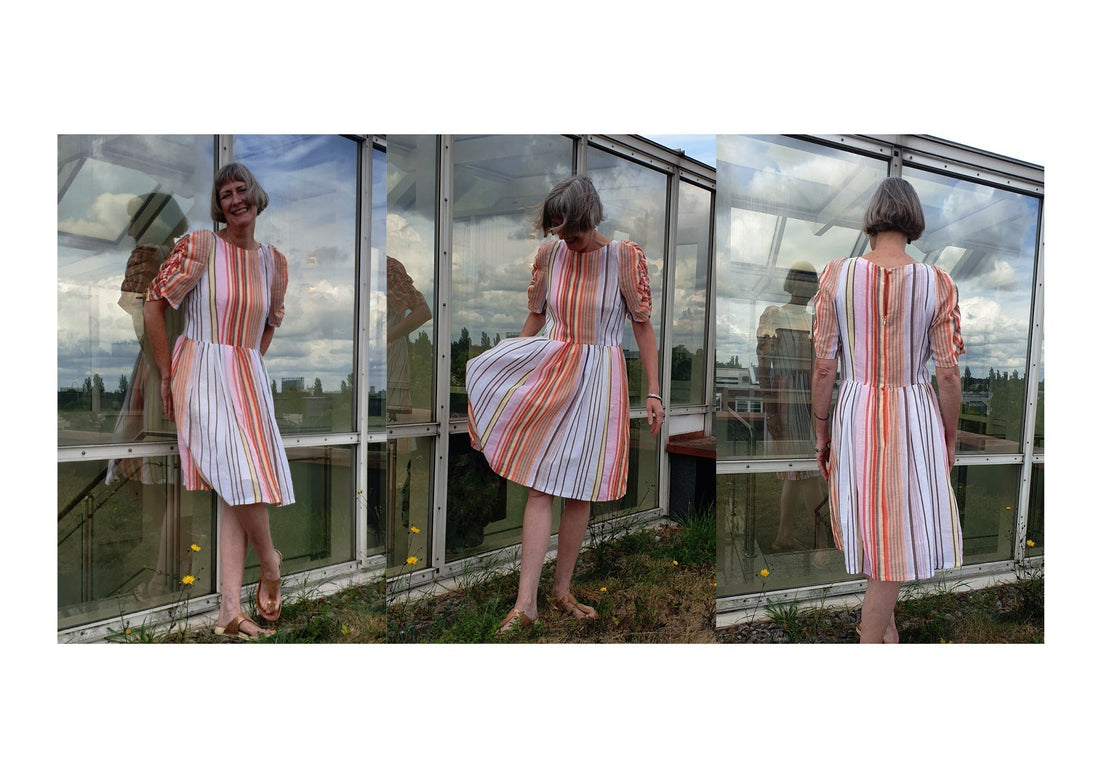
Are you in the mood for a playful summer look ? Then our enchanting "Cloud" dress is just what you're looking for! The airy, lightweight cut ensures comfortable wear and is just as easy to make. The voluminous sleeves are a real highlight and are gathered with an elastic band. Choose your favorite color and the perfect fabric – and you're good to go!
Length at back center = 97-101 cm
The cloud in this tutorial was sewn from a lightweight cotton fabric.
Materials needed:
We recommend a soft fabric with a slight structure, e.g. cotton, muslin or linen, opaque, as the dress is unlined.
Sizes 34-42
- Outer fabric 2.30 m x 140 cm wide
- Outer fabric, short version, 1.00 m x 140 cm wide
Sizes 44-50
- Outer fabric 2.40 m x 140 cm wide
- Outer fabric, short version, 1.10 m x 140 cm wide
Sizes 34-50
- Insert 0.35 m x 90 cm wide
- Lining 0.35 m x 140 cm wide
Aside from that:
- Form tape/insert tape 70cm
- Concealed seam zipper 45cm
- 2x rubber bands 0.5 x 30cm
- 1x eyelet button
Just so you know in advance:
You can also sew the "cloud" pattern as just a top. A line indicating "blouse length" is marked on the top pattern specifically for this purpose.
Cut:
Seam allowances are included - 1cm wide or as indicated by the marking notches!
Cut out the pattern pieces from your outer fabric and interfacing. Place the fabric with the right side facing up.
Lay the selvedges parallel to the center so you can lay out the back piece, undercollar, upper collar, and collar stand on the fold. All pattern pieces should be placed with the printed side facing up.
Always align the grainline arrow in the same direction for all pieces and parallel to the selvedge of the fabric.
Transfer all notches from the pattern through a 3mm long snip with scissors or with chalk and mark the ends of the darts.
Snip the seam allowance on the fold of the fabric, as this is always the center point. Markings define the positions of dart ends, pocket positions, etc. Transfer these either with chalk or pins.
For all outer fabric pieces that will be completely covered with interfacing, it's best to first cut them roughly to size. After you've secured the interfacing, cut them out precisely.
There is also a video here about gluing and fixing cut pieces.


You will need the following fabric:
- 1x front top part in breakage
- 1x front skirt piece in the fold
- 2x back top piece, mirror image
- 2x back skirt piece, mirrored
- 1x front part of the receipt in the broken section
- 2x receipt back, opposite side
- 2x pocket receipt, mirror image
- 2x sleeves, mirrored
Also includes insert:
- 1x front part of the receipt in the broken section
- 2x receipt back, opposite side

You will need lining fabric or a lightweight fabric:
- 4x pocket linings, opposite sides
Sewing instructions:
Seam allowances are included - 1cm wide or as indicated by the marking notches!
Seam allowances are including - 1cm wide or as marked
To sew this blouse you will need a sewing machine and an overlock sewing machine, or alternatively the zigzag stitch of your sewing machine to finish the cut edges.
The colored lines in the pictures show you, in addition to the description, where to sew a seam or glue something.
When sewing, pay attention to the seam allowance included in the pattern. Seam allowances not specifically marked are 1 cm wide!
Have fun sewing!

First, take the skirt pieces and finish all the cut edges except for the waist seam.

Next, you tackle the pocket bags: you neaten the straight edge of two identical pocket bags.

Now take the pocket lining, finish the long edge, and place it right sides together, aligning it with the short edge of the pocket bag, and stitch it in place. Finish the seam allowance together.
 Now you can stitch the receipt to the long side of the pocket bag.
 Next, sew the pocket bag to the back skirt piece, right sides together, with the facing facing....
 ...and topstitch the seam allowance on the facing with a sharp edge.
 Now do exactly the same thing on the front part of the skirt with the pocket bags without facings.

Now prepare the waist seam of the skirt. First, create the pleats according to the pattern instructions and secure them with a basting stitch. Then, work in gathering stitches. These help to achieve even gathering. Select the longest stitch setting on your sewing machine. Do not backstitch at the beginning and end of the gathering stitches; leave approximately 10 cm of thread. Sew two gathering stitches approximately 1 cm apart, one 0.5 cm and the other 1.5 cm from the cut edge, so that the final seam will run precisely between these two basting stitches. Pay attention to the pattern markings to determine the area where gathering is required.

You proceed in the same way with the back part of the skirt.
In this video, Dagmar shows you how to create a ruffle and how to best gather the fabric. You can also use these tips for your waist seam.

If you like, you can iron the hem fold into the skirt pieces now. However, you can also do this step right at the end after a fitting.

Next, let's look at the darts in the bodice pieces. The front bodice has two bust darts and two waist darts.

The back piece has 2 darts from the waist seam.
A simple, straight dart is sewn on the left side of the fabric, notch to notch, tapering nicely from the widest point to the point (so that the dart does not bunch up), after the pattern has been transferred exactly and the markings have been carefully observed.
Draw a line beforehand with tailor's chalk so that you don't sew too much or too little and that the side and waist seams finish nice and straight.
To avoid having to backstitch at the point, you can sew the last centimeter with a very small stitch. Press the dart's filling upwards and to the sides.
Next, you finish the side seams and the center back.

Now you can sew the top and skirt pieces together right sides facing along the waist seam.

Next, place the front piece right sides together and sew the side seam. Sew to the pocket opening, backstitch at that point, and close the pocket bag. Backstitch again and finish the side seam. Then you can finish the raw edges of the pocket bags and press the side seam open.

Now you finish the waist seam, including the top edge of the pocket bag. Important: the pocket bag must be facing forward.

Now we'll work on the closure at the back. Fold the ribbon for the eyelet lengthwise, wrong sides together, stitch it down, and turn it right side out using a longer thread and a needle.
Then, sew the eyelet to the left side of the back piece according to the cutting mark.

Now you need to attach the appropriate zipper foot to your machine. There are several types of zipper feet. This is one of them.

Place the closed seam ripper right sides together on the left side of the center back and stitch it in place. Pay attention to the notches for the ripper.

Our insider tip: before you sew the seam ripper on the right side, leave it folded and make a small snip with scissors exactly at the waist seam. Then pin this point in place on the right side. This ensures that you will have a visually continuous seam.

Now you can sew the seam ripper to the other side.

Next, sew the shoulder seams right sides together, finish the seam allowance and press it forward.
 Next, we'll work on the front and back neckline facings. Again, sew the shoulder seams right sides together and press the seam allowances open.
 Now the outer edge of the facing is finished and ironed over by 0.5cm.
 The edge is then topstitched close to the edge .

Now you can sew on the facing as shown in the photo. The corners are then trimmed and the seam allowance is clipped at the curve.

The facing is ironed inwards and the seam allowance is topstitched close to the edge on the facing.

Next, you'll tackle the sleeve. Finish the raw edges of the sleeve pieces all the way around, except for the armhole seam. Then, sew the front and back sleeves together, right sides facing, along the curved seam and press the seam allowance open.
 You can iron the hem right away.

Now take the elastic and sew it directly onto the seam on the inside of the sleeve. The easiest way to do this is to mark the elastic and the seam at the halfway point and at the quarter point, secure them there, and then stitch them on under tension. Make sure the elastic ends at the hem fold.
Here is a video for you that shows you how to easily sew the sleeve with the elastic band.

The sleeve side seam is sewn right sides together and pressed open, then you topstitch the hem.

The sleeves can be sewn into the respective armholes, right sides together. Pay attention to the notches.
The seam allowance is finished together and ironed into the sleeve.

The neckline facing is fixed at the shoulder in the "shadow of the seam" with a few stitches.

Final sprint! Now just iron the skirt hem up by 2cm and topstitch it....

...find the right button, sew it on, and hooray, done!
Your cloud is finished!
If you get stuck or have any questions, please feel free to contact us by email at info@schnittmuster-berlin.de. We will reply as soon as possible.
Have lots of fun with your new designer piece!
Sincerely, your Schnittmuster-Berlin team