

Sewing Instructions Dress Martha (+ Add-On Sleeves)
Two versions - one pattern: our Martha sewing pattern is now also available in a long-sleeved version. You can simply choose: without sleeves as before or with 3/4 long sleeves.
Jersey dresses are so wonderfully uncomplicated to wear; they don't pinch or pull anywhere and move effortlessly with you. The Martha dress is particularly well-suited for women with a few more curves. The pleats on the right side of the body prevent the figure from being overly emphasized, and the dress also looks more feminine and polished. This women's dress isn't difficult to sew, but it does require some experience with working with and reading patterns.
Length at back center = 98 - 103 cm
Martha was sewn from a soft jersey fabric in this tutorial.
Materials needed:
We recommend a flowing jersey fabric with some elastane.
Sizes 34-38
- Outer fabric 1.70m (140cm wide)
Sizes 40-44
- Outer fabric 1.90m (140cm wide)
Sizes 46-50
- Outer fabric 2.60m (140cm wide)
Cut:
Cut out the pattern pieces from your fabric . Place the fabric right side up. Always align the thread arrow in the same direction on all pieces, parallel to the selvedge of the fabric. Transfer all notches from the pattern by making a 3mm snip with scissors or using chalk . Snip the seam allowance on the fold, as this is always the center point. Markings define the positions of dart ends , pocket positions, etc. Transfer these either with chalk or pins .

You will need the following fabric:
- 1x front part
- 2x back piece, mirror image
- 1x neckline strip
- 2x sleeves, mirrored
Sewing instructions:
To sew this dress, you'll need a sewing machine and an overlock machine, or alternatively, the zigzag stitch on your sewing machine to finish the raw edges. Be sure to use a jersey needle and a stretch stitch. If you're using a regular sewing machine, you should use either a zigzag stitch or a three-step elastic stitch. Afterward, finish all seam allowances again with a zigzag stitch or another suitable stitch to prevent fraying. The colored lines in the pictures, in addition to the written instructions, show you where to sew seams or glue.
When sewing, pay attention to the seam allowance included in the pattern. Seam allowances not specifically marked are 1 cm wide!
Have fun sewing!

At the shoulders, create the two pleats according to the pattern and sew them in place.
Do the same with the small pleats on the right side of the front piece; position them according to the cutting mark and secure them.

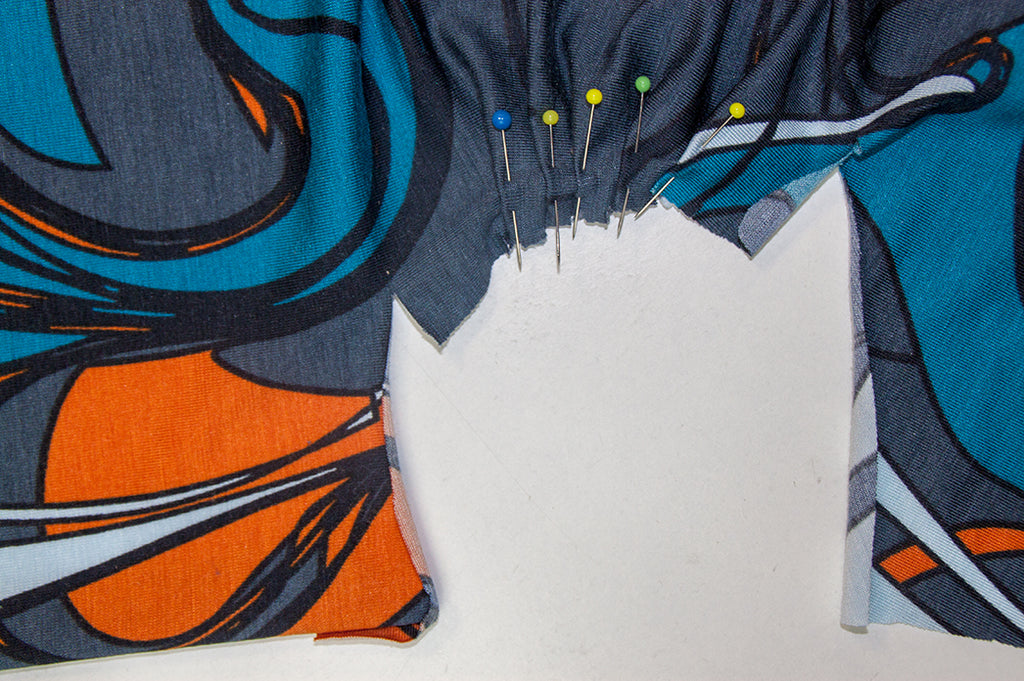
Continuing along the side seam: Here, using the longest stitch length, sew a seam from the side to the cross in the cut. Then, cut along this line further, until you are about 3-4 cm from the end.


Knot one end and gather the fabric until it is as long as the opposite section. Then place the two sections on top of each other and sew them together (this creates two darts).


Now, pin the dart seam allowances together and sew them. This creates a seam where the pleated section lies centered over the dart seam.

Now you have a small tunnel, which you flatten like a crease and ideally stitch down at the side.

Sew the two back pieces together right sides facing in the back center and press.

Now sew the shoulder and side seams together right sides facing and press.


For the winter version, you can either sew the sleeves to the armhole and then close the entire side seam plus the sleeve seam (here: as shown in the photos), or you can first sew the side seams of both the dress and the sleeve together and then insert the sleeve into the dress. If you want to sew the dress without sleeves, i.e., the summer version, then finish the two armholes exactly like the neckline; a corresponding strip is included in the pattern.


Take the neckline strip and sew it together along the narrow side. Now you need to iron this ring in half lengthwise.


Now, pin the ribbon to the neckline, right sides together, stretching it slightly. Distribute the width evenly; there are a few notches to help you. Then, topstitch the seam flat, press the ribbon to the inside, and topstitch it 0.7 cm from the edge.

Your MARTHA is finished!
If you get stuck or have any questions, please feel free to contact us by email at info@schnittmuster-berlin.de. We will reply as soon as possible.
Have lots of fun with your new designer piece!
Sincerely, your Schnittmuster-Berlin team.