Sewing instructions for the Fabia summer shirt
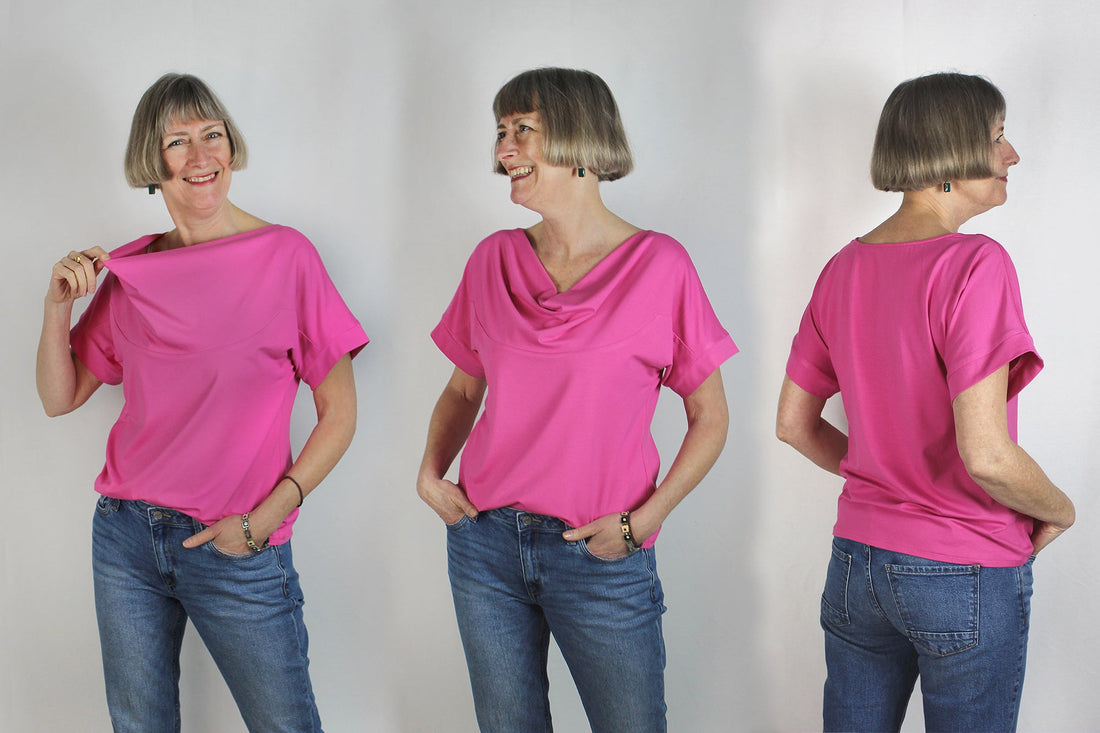
You can never have too many summer shirts, and the Fabia shirt is a true all-rounder, as it goes perfectly with trousers and skirts and is also perfectly suitable for the office under a blazer. The short, set-in sleeves and the waterfall neckline give the shirt its distinctive look.
Length at back center = 59-63 cm
Fabia was sewn from a viscose jersey in this tutorial.
Materials needed:
We recommend a flowing jersey fabric .
Sizes 34-42
- Outer fabric 1.40m x 140cm wide
Sizes 44-50
- Outer fabric 1.90m x 140cm wide
Cut:
Seam allowances are included - 1cm wide or as indicated by the marking notches!
Cut the pattern pieces out of your fabrics. to. Lay the fabric with the right side of the fabric facing up. Place the selvedges parallel to the center so that you Front and back You can lay it down in the fraction. Always align the thread arrow in the same direction for all pieces, parallel to the selvedge of the fabric. Transfer all notches from the pattern by making a 3mm long cut with scissors or using chalk . Snip the seam allowance on the fold of the fabric, because this is always a center point. is. Markers define positions of Transfer dart ends , pocket positions, etc. either with chalk or pins .

You will need the following fabric:
- 1x front part top in the break
- 1x front part bottom in break
- 1x back piece in half
- 2x sleeve hem strips
- 1x neckline strip at the back
Sewing instructions:
Seam allowances are included - 1cm wide or as indicated by the marking notches!
To sew this shirt you will need a sewing machine and an overlock sewing machine, or alternatively the zigzag stitch of your sewing machine to finish the cut edges.
Be sure to use a jersey needle and a stretch stitch. If you're using a domestic sewing machine, you should use either a zigzag stitch or a three-step elastic stitch. Afterwards, finish all seam allowances with a zigzag stitch or another suitable stitch to prevent fraying. The colored lines in the pictures, in addition to the written description, show you where to sew a seam or glue something.
When sewing, pay attention to the seam allowance included in the pattern. Seam allowances not specifically marked are 1 cm wide!
Have fun sewing!

First, sew a pilot stitch approximately 0.7 cm from the edge into the back neckline. This prevents the fabric from pulling out.

Iron the neckline strip in half and sew it to the back neckline, right sides together. Trim the seam allowance slightly.

Then iron the strip inwards and topstitch it all the way through at 0.7 cm. Do not stretch the strip while ironing; iron only briefly.

Place the back shoulder seam between the two layers of the upper front piece (these are right sides together). The finished edge of the back neckline lies exactly in the fold of the front piece.

Now close the shoulder seam, turn right side out and iron.

Sew the two layers of the upper front piece together along the shaped edge using a pilot stitch, ensuring they are perfectly aligned.

Now sew the lower and upper front pieces together right sides facing, neaten the seam allowances together and press towards the hem.

Iron the hem according to the instructions.

Sew the side seam right sides together, finish the edges together and press towards the back.

Now neaten the hem and topstitch.

Iron the armhole strip in half, then sew the short sides together right sides to form a round and iron the seam allowances open.

Sew the two strips together using a pilot stitch, ensuring they are perfectly aligned.

Now sew the strip to the torso, right sides together. Pay attention to the notches.

Finally, neaten the seam allowances together and iron them into the body.
Your Fabia is finished !
If you get stuck or have any questions, please feel free to contact us by email at info@schnittmuster-berlin.de. We will reply as soon as possible.
Have lots of fun with your new designer piece!
Sincerely, your Schnittmuster-Berlin team.