Sewing instructions sweater jacket Whitney
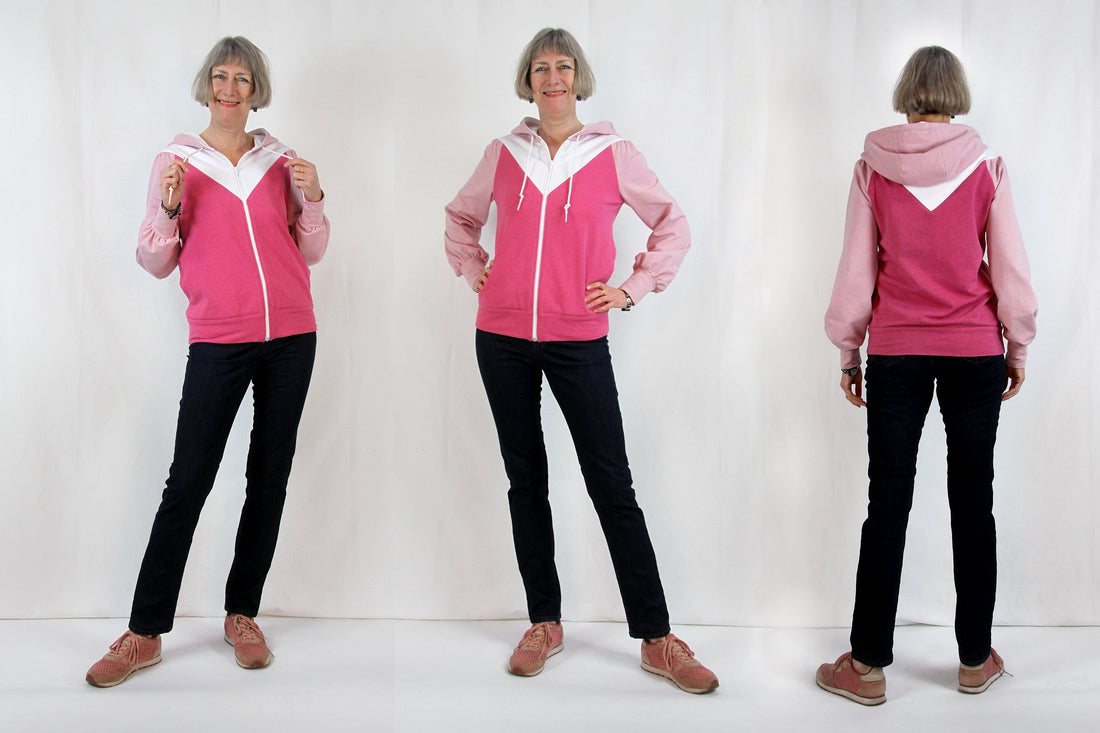
A slim-fit sweater jacket, ideal for layering on cool summer evenings or after sports. The graphic panels allow you to patch colors and patterns or use up leftover fabric scraps. The unique feature is the sleeve construction, a blend of raglan and cap sleeves. The drawstring hood and the two-way zipper give the sweater jacket its sporty feel.
Length at the back center = 58-64 cm.
If you would like to make the jacket without a hood, you will find a neckband option in the pattern.
Whitney was sewn from sweatshirt fabric in this tutorial.
Materials needed:
We recommend a sweatshirt , velour, or a knitted fabric .
University
Fabric consumption for sizes 34-42: 2.00 m
Fabric consumption for sizes 44-50: 2.20 m
3 colors
Fabric consumption for sizes 34-42: 0.90 m each
Fabric requirements for sizes 44-50: 1.10 m each
For both variants
separable zipper
Gr. 34-36 = 50cm Size 38 = 51 cm
Gr. 40 = 53 cm size. 42 = 54cm
Gr. 44 = 56 cm size. 46 = 58cm
Size 48-50 = 60 cm
Cord 7 mm diameter 1 x 1.30 m
Cut:
Seam allowances are included - 1cm wide or as indicated by the marking notches!
Cut the pattern pieces from your Outer fabric to. Lay the fabric With the right side of the fabric facing up. Place the selvedges parallel to the center so that you Front piece, back piece, front and back facings You can lay the pattern pieces on the fold. All pattern pieces should be placed with the printed side facing up. Always align the thread arrow in the same direction on all pieces and parallel to the selvedge of the fabric. Transfer all notches from the pattern by making a 3mm snip with scissors or by marking them with chalk. and snip the seam allowance on the fold of the fabric, because this is always a center point. is. Markers define positions of Transfer dart ends , pocket positions, etc. either with chalk or pins .

You will need fabric A
- Sleeves 2x opposite
- cuffs 2x
- Center hood 1x
- Side hood 2x opposite

You will need fabric B
- Front part bottom 2x opposite
- Back section bottom 1x on the fold
- Pocket bags 2x opposite each other
- Hem band 1x in the break

You will need fabric C
- Pocket bags 2x opposite each other
- Front document 2x opposite
- Center hood 1x
- Side hood 2x opposite
- Front part top 2x mirror image
- Back section top 1x on the fold

Also with shaping tape
- front edge at the bottom of the front piece and the slope at the top of the front piece
- front edge of front panel
Also with insert
- inferior to the buttonhole position on the outer hood
Sewing instructions:
Seam allowances are included - 1cm wide or as indicated by the marking notches!
You will need a sewing machine to sew this sweatshirt.
The colored lines in the pictures show you, in addition to the description, where to sew a seam or glue something.
When sewing, pay attention to the seam allowance included in the pattern. Seam allowances not specifically marked are 1 cm wide!
Have fun sewing!

Start by sewing the outer hood. To do this, sew the side hood pieces to the center hood, right sides together. Press the seam allowances open. Make the inner hood from fabric C in the same way.

Iron a piece of interfacing under the buttonhole position on the outer hood and mark your buttonhole (approx. 2cm in size).

Now sew the buttonhole on both sides of the hood and cut it open.

Now, turn both hoods right sides together along the outer edge. Topstitch this seam flat;

Next, we'll work on the sleeve cuff. Place the pieces right sides together along the grain, sew the seam, and then press it open.

Fold the cuff in half and sew both layers together with a basting stitch (0.5cm from the edge).

Next, prepare the sleeve. Sew the lower third of the sleeve together, right sides facing, and press the seam. Sew two gathering threads 0.5 cm apart along the hem edge; there's a video tutorial for this.

Now gather the sleeve hem to match the cuff width.

Sew the cuffs to the sleeves, right sides together.

Now let's move on to the side seam pockets. Finish the raw edges of the pocket bag along the straight seam and sew the bag to the back piece or front piece, right sides together, between the notches. Make sure you use the correct color!

Now close the side seams above and below the sewn-on pocket bag, starting and ending exactly at the beginning and end of the bag. Press the side seams open.

Stitch the front pocket bag flat; this

Next, close the pocket bag all the way around and finish the raw edges. Sew the bottom edge to the hem of the jacket with a basting stitch.

Gather the front and back sleeves in the ball shape according to the torso parts.

Now the still open sleeve seam can be closed.

Finish the sleeve cap and armhole separately, then sew the sleeve in right sides together, paying attention to the notches. Press the seams open at the top.

Sew the shoulder seam on the pointed tops right sides together and press open.

Sew the bodice to the body, right sides together, ensuring a clean corner at the center back and aligning the notches. Clip the corner, finish the seam allowance together, and press it towards the body. Remove any visible gathering threads.

Iron the hem in half...

and sew the outer waistband to the jacket, right sides together.

Sew the zipper to the torso right sides together, making sure that the "arrow seams" and the waistband seam are at the same level.

Sew the facing to the inner waistband right sides together, then finish the inner waistband edges.

Fold the waistband into the fold and sew the front facing edge to the zipper/front piece (right sides together), turn right side out and iron.

Stitch the zipper on both sides, 0.5cm wide.

Secure the facing along the neckline with a temporary stitch.

Stitch the waistband in the shadow of the seam to secure the inner waistband.

Sew the hood to the neck opening, right sides together, making sure you hit the correct point on the zipper at the front.

Turn the inner hood down as far as possible, trimming the front corners slightly.

Fold in the seam allowance of the remaining inner hood and topstitch close to the edge.

For the tunnel, stitch the hood 2.5cm from the edge.

Finally, thread the cord through using a safety pin.
Your Whitney is finished !
If you get stuck or have any questions, please feel free to contact us by email at info@schnittmuster-berlin.de. We will reply as soon as possible.
Have lots of fun with your new designer piece!
Sincerely, your Schnittmuster-Berlin team.