Sewing Instructions Bag Caracas
Required material:
We recommend jeans, cotton, corduroy or canvas.
fabric for simple bag 0.40m (140cm wide)
fabric for designer bag 0.80m (140cm wide)
If you want to make the strap out of the same fabric, you should buy 10cm more fabric.
lining 0.40m (140cm wide)
insert 0.25m (90cm wide)
zipper 1 x 30cm
webbing 4cm wide 1.50m
D-rings 2x 2cm wide
2 carabiners
Cutting:
Seam allowances are included - 1cm wide or as marked!
Cut the pattern pieces out of your outer fabric. Lay the fabric with the right side facing up. Lay the selvedges parallel to the middle. The pattern pieces should all be laid out with the writing facing up. Always align the grain arrow on all pieces in the same direction and parallel to the selvedge of the fabric. Transfer all notches from the pattern by making a 3mm long cut with scissors or chalk and mark the ends of the darts. Notch the seam allowance along the fold of the fabric, as this is always the middle. Markings define the positions of dart ends, pocket positions, and much more. Transfer these either with chalk or pins. It is best to cut all outer fabric pieces that are to be completely covered with interlining roughly first. After you have secured the interlining, cut it out precisely. There is also a video here about gluing and securing pattern pieces.


You will need fabric:
- 2x pocket bags opposite each other
- 1x strip for the zipper ends
- 2x piping opposite
- 2x bars opposite each other
Or:
For the bag with fabric manipulation you need:
- 2x contrast pocket bags opposite each other, this is the bottom of the bag onto which the cut-out pocket parts are stitched.
- 4x pocket bags opposite each other, the fabric that is seen above and is cut.

You need lining: no matter which variant you sew
- 2x pocket bags opposite each other
- 1x inside pocket
Sewing instructions:
Seam allowances are included - 1cm wide or as marked
To sew this bag you will need a sewing machine.
In addition to the description, the colored lines on the pictures show you where a seam needs to be sewn or something needs to be glued.
When sewing, pay attention to the seam allowance included in the pattern. Seam allowances that are not specifically marked are 1cm wide! Have fun sewing!

We start with the preparation for the cut pocket surface.
If you want to sew a bag without cuts, you can skip the next 4 photos.
 You take the two top layers of fabric for the front and back (this is just an example square) and transfer the markings from the cut. You can use a ruler to draw the lines by connecting the clips. The lines that will later be cut open are marked with small circles in the cut.

Now place all 2-3 layers on top of each other and pin them together well. The bottom layer is the contrasting fabric. Next, sew the quilting lines.

Once you've finally done that, it's time to cut it open, but only the top layers, not the contrasting base.

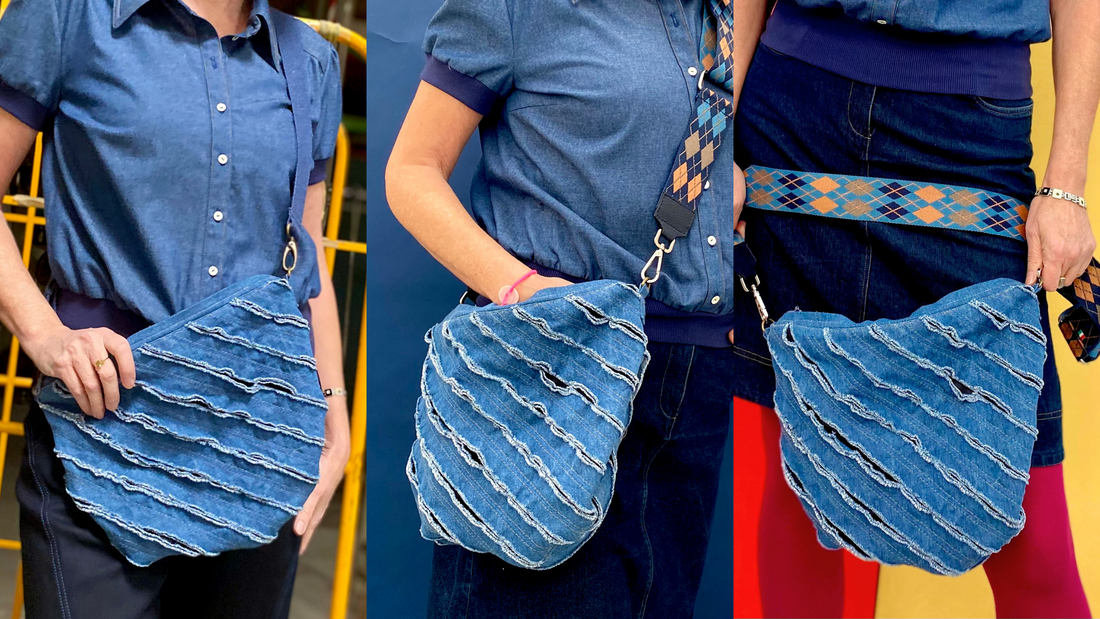
Stitch all the layers together all the way around. Now you can wash both of your bag parts in the washing machine, only then will the "wave look" of the edges be created.
Since the cut edges run diagonally to the grain, the edges fray only very slightly.
The fabric manipulation is finished!
Next we will show you how to sew the bag together.

The small inner pocket is ironed twice 1.5cm along the upper edge and stitched through. Iron the 3 open sides 1cm inwards. Then pin the pocket onto the lining as marked. Stitch the pocket onto the inner pocket just a little bit, using the width of a stitching foot.

Place the two lining bags right sides together and sew them together. Leave an opening of about 10 cm at the curve. The bag will be turned through this opening later. Iron the seam allowance open at the straight beginning.

Next, we move on to the outer fabric. Place this right sides together and sew it together. Iron the seam allowance open at the straight beginning.

The seam allowance of the bag is stitched from the outside. Leave the bag inside out and stitch the seam allowance onto the outer fabric just to the left and right of the seam.

Next, iron the top short strips in half and do the same with the long zipper piping.
The bottom strip is folded 2x 1cm towards the middle on the long side. More on this later.

Now it's time for the zipper. Sew the small pieces of fabric onto both ends, with the fold facing inwards. These two pieces of fabric cover the beginning and end of the zipper.

Next, we'll move on to the long strips. Place this fold edge to fold edge in the middle of the zipper. First, sew the short edges. Change your quilting foot and use the half foot. Then sew the long sides onto the zipper with a distance of 0.7cm from the zipper rail.

Take a short break to drink something before sewing the zipper onto the bag. Fixing the seam with pins is a must! Pin the middle notches of the bag and the zipper together, right sides facing. The corners of the strip must be pinned to the outer notches. Sew one side from notch to notch.

Do the same on the other side. My tip for you: cut the outer 4 clippers 1cm wide, but definitely not longer.

Now just close the short sides! You had to cut the corners for these two seams. 
Now you can turn the bag over and admire your work. Yippee, you've done the hardest part! Or maybe not? Maybe I'm just saying that to get you to keep sewing... let's find out. ;)

You should now have a pre-ironed strip left over. Stitch the strip down the middle lengthwise on both sides. Cut the strip exactly in half.

Now you need the two D-rings. Fold the two strips as shown in the picture and pin them together. The D-rings are in between.

Sew the two tabs on the left and right of the bag. To do this, turn the bag inside out so you can get to it more easily.

Now all that's missing is the lining. To do this, turn the bag inside out. The lining bag is sewn onto the zipper strip. So nothing new for you. The lining is pinned onto the zipper strip, right sides together. The corners of the strip must be pinned to the outer notches. Cut the outer notches up to 1cm wide. Only sew the side from notch to notch.

Do the same on the other side. Here too, cut the outer notches up to 1cm wide. For those who want to do more: you can stitch the seam allowance onto the inside of the lining close to the edge.

Now just the short sides! Lay everything out straight and sew the short sides together. Done!!!!!

Oh yes, there is another hole in the lining bag. You can use this hole to turn your bag right side out. Iron the seam allowance inwards and sew the edges close together.

The carrying strap is a 4cm wide cotton strap. We have attached the snap hook at the beginning and end. To do this, pull the strap through the snap hook, fold the end in 1cm and stitch the edge onto the strap at a distance of 2cm from the metal rail. Lock the seam particularly well at the beginning and end.

Your CARACAS is ready!
If you don't know what to do or if you have any questions, please send us an email at info@schnittmuster-berlin.de. We will answer you as quickly as possible.
Have lots of fun with your new designer piece!
Sincerely, your Schnittmuster-Berlin team