Sewing instructions for waterfall dress Julia
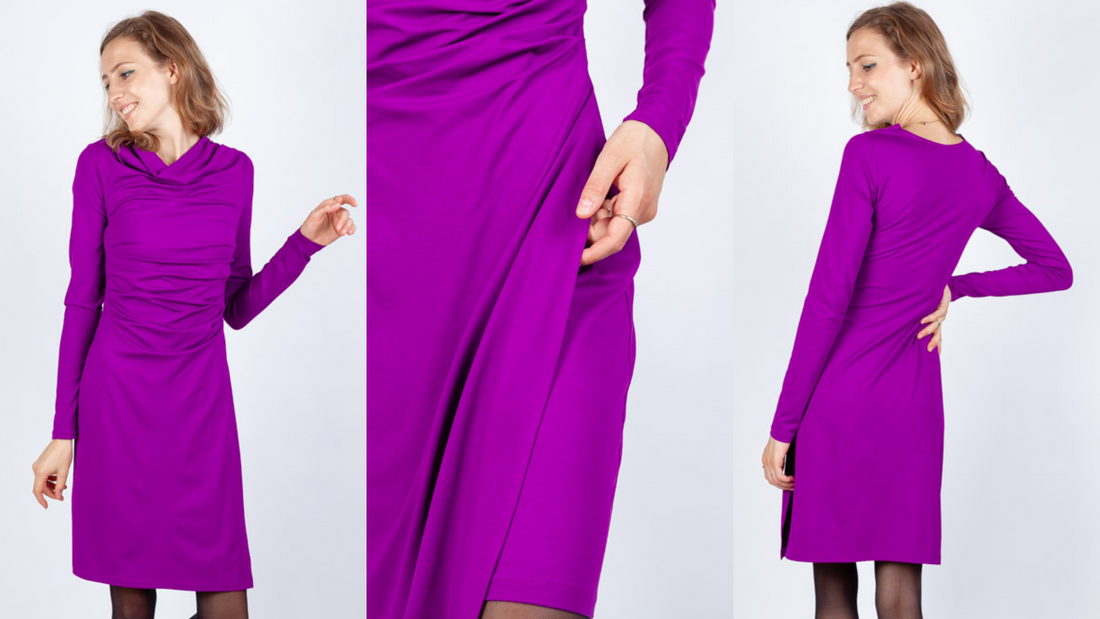
The Julia jersey dress is a quick sewing project and a real eye-catcher thanks to its soft waterfall neckline and pleated waist. The double-stitched front and pleats emphasize the feminine curves while concealing any excess fat.
Length at the center back = 93 – 97 cm
In this tutorial, Julia was sewn from a soft viscose jersey.
Required materials:
We recommend a soft jersey with elastane, opaque, as the dress is unlined.
| Sizes 34-46 | Outer fabric | 2.30 m | 140 cm wide |
| Sizes 48-50 | Outer fabric | 3.40 m | 140 cm wide |
Cutting:
Seam allowances are included - 1cm wide or as per marking clips!
Cut out the pattern pieces from your outer fabric. Lay the fabric right side up. Position the selvedges parallel to the center so you can place the front and back pieces on the fold. The pattern pieces should all be laid with the writing facing up. Always align the grain arrow on all pieces in the same direction and parallel to the selvedge of the fabric. Transfer all notches from the pattern by making a 3mm snip with scissors or chalk. Notch the seam allowance along the fold, as this is always the center. Markings define the positions of darts, pocket positions, and much more. Transfer these either with chalk or pins.


You will need fabric:
- 1x front part-outside in the break
- 1x front part inside in the fold
- 1x back part in the fracture
- 2x sleeves opposite
- 1x neckband
Sewing instructions:
Seam allowances are included - 1cm wide or as per marking clips!
To sew this dress you will need a sewing machine and an overlock sewing machine, or alternatively the zigzag stitch on your sewing machine to neaten the cut edges.
Be sure to use a jersey needle and a stretch stitch. This means that if you're using a home sewing machine, you should use either a zigzag stitch or a three-part stretch stitch. Then, finish all seam allowances with a zigzag stitch or another similar stitch to prevent fraying. The colored lines in the images show you, in addition to the description, where a seam needs to be sewn or glued.
When sewing, pay attention to the seam allowance included in the pattern. Seam allowances not specifically marked are 1cm wide!
Have fun sewing! 
Start your sewing by pinning the pleats in the shoulder and waist area of the outside front piece. Pay attention to the notches and directional arrows for the pleats on the pattern. Note: The pleats open upwards; don't confuse the right and wrong sides of the fabric. The shoulder seam has a 1cm seam allowance, while the side seam has a 1.5cm seam allowance. The photo above of my sample dress is from the wrong side of the fabric. Also, neaten the hem of the front piece. 
Iron the hem of the front piece according to the pattern. There's a slit on the left side of the dress. Prepare this by double-folding the left front edge 0.7 cm and then pressing it over to the top notch. The seam allowance at the notch needs to be snipped so that the ironed seam can be easily folded later with the neatened seam allowances. 
Now stitch the prepared front edge close to the edge… 
… and then secure the hem all around. 

Now place both front pieces on top of each other and sew them together. It's important that the inner front piece, wrong sides together , is placed on top of the outer front piece, and that the neckline seams are sewn together. Note: both front pieces are sewn with the right sides facing out, so they're sewn with the wrong sides together. Pay attention to the notches in the pattern. 
Iron the seam allowances apart. 
Sew the front pieces together, right sides together, and sew the side seams together. Make sure you only sew the side seam on the left side of the body up to the notch/beginning of the slit. The seam allowance of the inner front piece remains unfolded while stitching the right side. 
Neaten the hem of the inner front piece individually and iron it according to the pattern. 
Here you can see a detailed view of the front pieces for processing the hem of the right side of the body. 
You also prepare the hem of the back piece by neatening and ironing according to the pattern. 
Now let's move on to the neckline. Place this, wrong sides together, in the fold, and stitch a stitching width that's the width of your stitching foot. 
Place the ribbon, right sides together, over the neckline of the back piece and stitch it in place with a 1cm wide seam. Stretch the ribbon slightly to fit the neckline during this process. Trim the seam allowance afterwards to ensure it's not too thick. 

Here you can see a detailed view with a flat-stitched seam and trimmed seam allowances. 
Then fold the ribbon inwards (wrong side of the fabric) and stitch it close to the edge. 
Here you can see a detailed view of how the neck hole of the back piece looks from the inside. 
Now, place the side seams of the front and back pieces, right sides together, and sew them together. Make sure to push the slit on the left side of the body slightly out of the way so you don't accidentally sew it in. Neaten the seam allowances together and then press them to the front (right side of the body) or back. The hems of the back and inner front pieces are open (see photo below). 
Here you can see a detailed photo of the hem on the right side of the body. 
Now fold the ironed hem over and stitch it in place from the inside front and back pieces in one go. Start on the right side of the body. 
The shoulders are also turned out. The shoulder seam of the outer front piece lies, right sides together, on the shoulder seam of the back piece, while the inner front piece is folded over and placed on the shoulder of the back piece, but wrong sides together. This way, both front pieces enclose the shoulder seam of the back piece, and everything is neatly turned out. Note: The fold of the top pleat ends at the shoulder point at the neckline. You should trim some of the seam allowance at this point so that the seam lies better when turned out and this area doesn't become too thick. 
Here you can see a detailed view of the first seam of the outer front piece with the back piece. 
Here you can see a detailed view of the second seam of the inner front piece with the back piece (right in the photo) and how it should look after facing (left in the photo). 
Place the sleeves on top of each other, right sides together, sew them together, neaten the seam allowances and iron them backwards. 
You neaten the hem… 
… and iron it upwards according to the pattern. 
Then stitch the hems. 
The sleeve width is provided with an auxiliary seam the width of a quilting foot to counteract the expansion of the jersey. 
For your information: Sew the armholes of the front pieces together with a stitch to secure the two layers of fabric.
Now all you have to do is position the sleeves into the correct armhole of your dress and sew them in. Neaten the seam allowances together.
Your JULIA is ready !
If you're stuck or have any questions, please email us at info@schnittmuster-berlin.de. We'll respond as quickly as possible.
Have lots of fun with your new designer piece!
Sincerely, your Schnittmuster-Berlin team.